Getting Started
Installing a Smart Smart Citizen Kit 1.0 / 1.1
Welcome aboard! The Smart Citizen Team wants to thank you for being here, for purchasing a kit, and for joining the community taking part in this adventure.
To join the Smart Citizen family, we're going to walk you through the steps to add your Smart Smart Citizen Kit to the platform, we'll refer to the Smart Smart Citizen Kit as the SCK for now on.
SIGN UP
First, go to smartcitizen.me using your web browser, currently only Google Chrome is supported for the SCK configuration process. Click in Go to the platform and then Sign up on the upper right menu. Complete the required fields, accept the Terms of use and privacy and click the Sign up button.
Required Fields:
-
Username - Pick any name you want as long as someone else isn't already using the it.
-
Email - Enter your email address.
-
Password - Must be at least 6 characters.
You are now registered, you will receive an email notification. You will be able to complete your user details later on your profile page.
ADD YOUR SMART Smart Citizen Kit
On the upper right menu click on Log in and write the access credentials you just choose. Go on your user icon on the upper right corner and click Profile. On your kit's profile page click on Add a new kit.
Please, provide basic information about your kit so others can understand better how you set it up and how you plan to use it.
-
Title - Give your SCK a name. This title will be associated with your SCK data.
-
Exposure - The SCK is designed to work outdoors but maybe you like to test it indoors first. Choose INDOOR or OUTDOOR to help others understand the data you will provide.
-
Kit location - Please, let us locate you, later you can adjust the location by dragging the marker on the map.
-
Kit tags - We suggest you to add tags to help other find your kit. Choose from the available tags or submit a tag request on the Forum.
-
Description - This is an optional field that helps others understand the data you provide. Why is it for? Is this part of any kind of project? Information like "outdoors in my balcony facing the road" or "in my garden under a tree" could help others understand why some of your data looks the way it does.
Click on the Next button, you are close to the end.
SETUP YOUR SMART Smart Citizen Kit
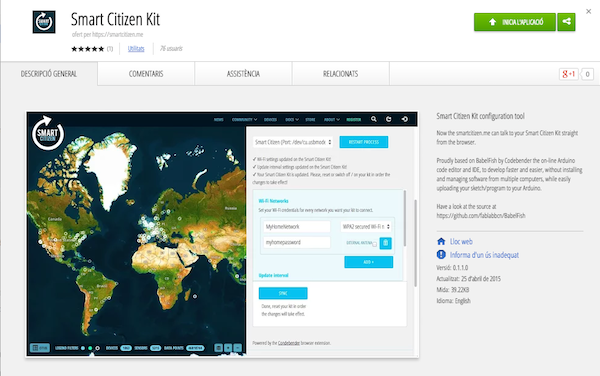
In order to have your kit connected to the Smart Citizen platform, we need a few step involving the connexion of your kit to your computer. This tool will help you register your kit to the platform, setup your kit's Wi-Fi settings and update its firmware. Currently we support Google Chrome in Win, Mac and Linux.
If you are on Windows check first How to install the drivers on Windows? section for more information.
Click on the ADD TO CHROME button and wait for the extension to install.
Finally its time to unpack your SCK. Connect the micro USB cable to your SCK and your computer and turn on the SCK switch on the upper left corner.
On the dropdown menu you should select the port your SCK is connected.
On Mac and Linux the port will be named Smartcitizen or something like /dev/ttyACM0. On Windows this is likely to be COM3 or higher (COM1 and COM2 are usually reserved for hardware serial ports). To find out, you can disconnect your SCK and check the dropdown; the entry that disappears should be the SCK board. Reconnect the board and select that serial port.
If you have any issue check your kit is properly connected, switched ON and you do not have the Arduino IDE or other software that uses the serial port open. We recommend you to switch your kit OFF and ON in order to reset the kit before you start.
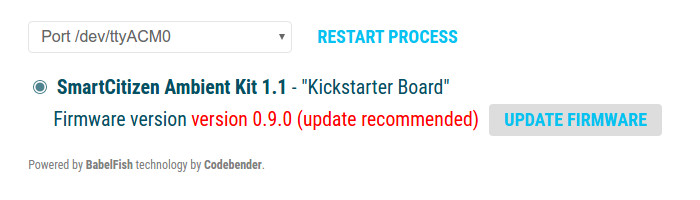
Now just click Start process in order to start configuring your kit.
The configurator will try to determine your hardware and firmware version, if your firmware version is below 0.9.3 you need to update the firmware in order to continue with the process.
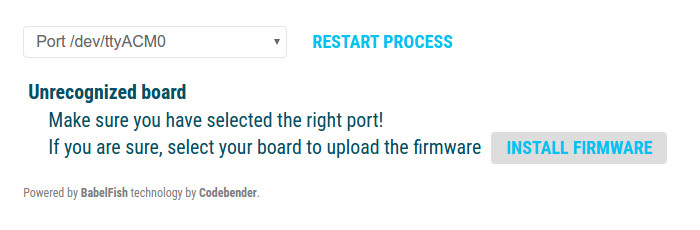
If the configurator can't communicate with your board it will report an Unrecognized board, we recommend you to try a couple of times, disconnecting your kit, reloading the page and connecting it again to make sure that this is not just a serial port communication problem.
If the configurator still can't communicate with your kit it may be a firmware/hardware problem. You may try to install the firmware and see if this solves the problem.
If you can't upload the firmware please refer to the Firmware update problem section or try doing a Manual set up.
After firmware is installed/updated we can continue with Wi-Fi settings.

You can add up to 5 different Wi-Fi credentials in your kit. This will allow your kit to connect to multiple networks in case one fails or you will like to move in between to places
You should complete the fields with your router or access point information:
At home you should find all the requested information below your home fiber or DSL router on schools and companies you can contact your IT team
-
SSID - This is your Wifi network's name, for example: My Home Wifi.
-
Phrase - This is your Wi-Fi password, you will usually find it written under your router or you can contact your IT team. If your Wi-Fi doesn't have a password just leave it empty and select Open Wi-Fi network on the Encryption dropdown.
Take care the SSID and Phrase can't be longer than 19 characters and they can't contain the $ symbol.
-
Encryption - Optional You can leave it to WPA2 this is the default for most modern networks.
-
External Antenna - Optional Is your SCK quite far away from Wi-Fi access point? You can use an external antenna with your SCK. Check the How to use an external antenna? )
Next step is optional, you can set your SCK update interval to optimize the battery performance and sensor resolution ratio.

By default your SCK will take a reading every minute and post it on-line
-
Reading interval - This defines every how much time your SCK sensors will take a reading and record it. You can set it from 1 minute to an hour.
-
Number posts - This defines every how much sensor readings your SCK will publish the reading on-line. You can set it from 1 to 20.
Now is time to record the settings on your SCK, just click on Sync Settings and wait for a moment.
If there is any issue during the process this will be displayed on the **Message window* above. I f you need help please contact support@smartcitizen.me *
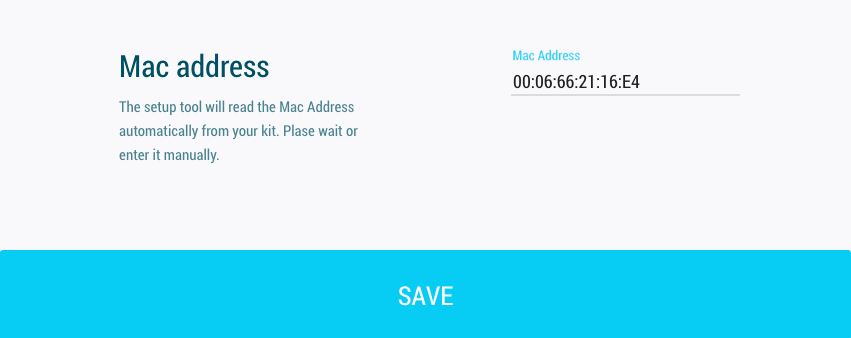
Last but now least you will see your SCK Mac Address registered below this is the ID of your SCK. Just click on Save and wait for your kit to publish. Done!
You might need to wait up to 2 minutes or more if you changed the time update settings and refresh your browser in order to see your SCK first post in your device page.
Did you registered your SCK before or did your SCK belong to someone else before? Take care your SCK can be registered once at a time, in case you registered before check How to unlink your SCK? or contact support@smartcitizen.me .
Please, if your kit is not publishing properly contact support@smartcitizen.me or ask for help in the forum .
Manual set up: The Serial Way
In this tutorial aimed to advanced users you will configure your SCK using serial communication. By using serial communication, you will register your Wi-Fi settings into the SCK and save the SCK’s MAC address in our server.
The SCK, like most Arduino chips, has the ability to communicate through serial protocol (when plugged with a proper USB cable). The SCK uses the WiFly module to communicate with your Wi-Fi router. Anyway, through serial communication you will be able to send the commands directly with this module to set your Wi-Fi settings and extract the MAC address used by our server to verify your identity.
Note that this tutorial works for both SCK v1.0 (from the Goteo crowdfunding campaign) and SCK v1.1 (from the KickStarter crowdfunding campaign), independently of the firmware version used.
Configuring the Wi-Fi settings
- Open Arduino IDE.
- Connect your SCK via USB.
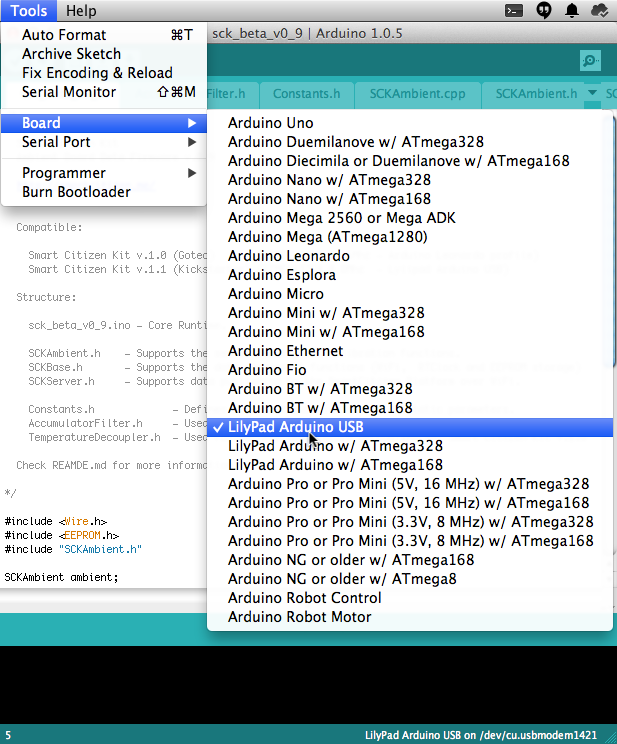
- From the Tools > Board menu, choose the right USB port (generally the last one).
- From the Tools > Serial port menu, select the right board. This is Leonardo for SCK v1.0 (Goteo) or LilyPad Arduino USB for SCK v1.1 (Kickstarter).
- Open the serial monitor window in the Arduino IDE (button at the top-right of the main window).
- Set the options to "115200 baud" and “No line return” (drop-down menu at the bottom-right of the monitor window).
- Wake up the module and activate the Wi-Fi command mode by typing in the serial monitor:
$$$
-
Change to “Carriage return” option (drop-down menu at the bottom-right of the monitor window)
-
Add a new SSID to memory by typing:
set wlan ssid XXX
Note: You have to replace XXX with your ssid name, filling any space with the dollar ($) character. Due to hardware limitations it can't be longer than 32 characters.
- Add a new phrase to memory (optional, password for WPA1 & WPA2):
set wlan phrase XXX
Note: You have to replace XXX with your phrase, filling any space with the dollar ($) character.
- Add a new key to memory (optional, password for WEP & WEP64):
set wlan key XXX
- Add an authentication method into memory (replace XXX by “0” for Open, “1” for WEP, “2” for WPA1, “4” for WPA2, “8” for WEP64):
set wlan auth XXX
- Add an antenna type into memory (replace XXX by “0” to use the internal antenna or “1” if you use an external antenna):
set wlan ext_antenna XXX
- Get the MAC address of the kit by typing:
get mac
-
Copy/Save the answer for further use.
-
Exit and go back to the normal operational mode by typing:
exit
Registering the kit in the platform
After you've uploaded your settings, don't forget to register your kit in our database by saving it's mac address. To find the mac address, you can use the serial command "get mac". Or have a look at the wifi module on the board and read the serial number under the bar code (something like "131G0006662116E4" on kit v1.0 or "0006662116E4" on kit v.1.1).
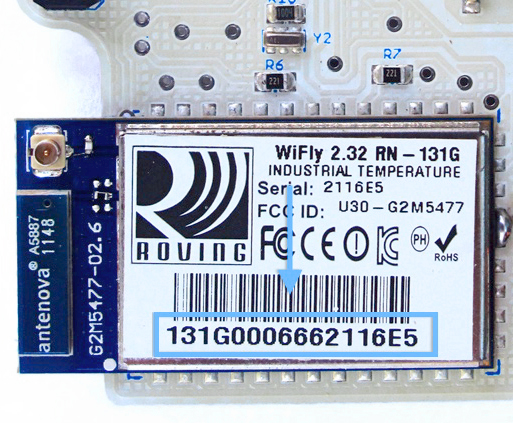
The mac address is the last 12 digit of this serial, separated by a colon every two number. From a number like 0006662116E4 you would write 00:06:66:21:16:E4.
In both cases, you have to fill the mac address input field in the configuration page of your kit and press the save button.
You are now done with the manual configuration of your SCK. Wait for a few minutes to see your data coming on the server and being displayed on the web page. You can also check that everything is ok by looking at the Arduino serial monitor. Debug messages coming from your SCK should look like this:
If you want to explore further options with the WiFly module check The SCK Command Line section.
If you encounter any issue, please share your problem on the forum
Manual set up: The Compilation Way
This tutorial is aimed to advanced users, we will guide you through the process of setting up your kit by editing directly the source code. As the code is Open Source, one way of setting the Wi-Fi of your SCK is to download the latest firmware, edit some lines of code, recompile it and upload it to the kit.
One advantage of this method is that it gives you the opportunity to register multiple Wi-Fi networks at the same time and make the persistent. The Wi-fi networks that you register directly in the source code are called hardcoded and the only way to remove them is with the same process of compiling and uploading the firmware again. This is useful if your SCK is traveling from one location to another where the Wi-Fi credentials are known.
The downside of this method is that you can not extract the MAC address of your kit, if you don't know it yet you will have to use the method described in The Serial Way or via the configurator in the setup page of your kit.
Getting the Firmware
You can download the latest firmware on our Github:
https://github.com/fablabbcn/Smart-Citizen-Kit/releases
As you may know, the hardware and software are based on the Arduino project. We will use the Arduino IDE to edit the firmware and upload it to the kit. This tutorial have been tested with Arduino 1.6.8, please download and install the Arduino IDE.
Once installed open the file Smart-Citizen-Kit/sck_beta_v0_9_0/sck_beta_v0_9.ino
Editing the code
If you want to set the network configuration manually, you should go to the Constants.h tab and modify the lines you see below:
#define networks 0
#if (networks > 0)
static char* mySSID[networks]      = {
  "SSID1"      , "SSID2"            };
static char* myPassword[networks]  = {
  "PASS1"      , "PASS2"            };
static char* wifiEncript[networks] = {
  WPA2         , WPA2               };
static char* antennaExt[networks]  = {
  INT_ANT      , INT_ANT            };
#endif
The easiest way would be to write "#define networks X" (where X is the number of WI-FI networks you are going to use) and fill the options for your network:
- Add the name of your network in
SSIDXand the corresponding password inPASSX. Due to hardware limitations neither the password or the ssid can't be longer tham 32 characters. - On
wifiEncriptyou could also choose the encryption mode that fits with your network's configuration (OPEN,WEP,WPA1,WPA2,WEP64). - On
antennaExtyou can choose the type of antenna you are using (INT_ANTfor internal antenna (default) orEXT_ANTfor external antenna).
If you register only one wifi credential, you should obtain something like this:
#define networks 1
#if (networks > 0)
char* mySSID[networks]      = { "MyWifiSSID" };
char* myPassword[networks]  = { "MyPassword" };
char* wifiEncript[networks] = { WPA2 };
char* antennaExt[networks]  = { INT_ANT };
#endif
Note that if you configure more than one Wi-fi network you have to separate the variables with a comma, for example:
char* mySSID[networks] = { "MyFirstSSID", "MySecondSSID" };
Uploading the code
On the Arduino IDE Tools menu you should select the right Board in the Boards menu:
-
For SmartSmart Citizen Kit version 1.0 select Arduino Leonardo (ATmega 32U4 at 16Mhz)
-
For SmartSmart Citizen Kit version 1.1 select Arduino LilyPad USB (ATmega 32U4 at 8Mhz)
The Arduino IDE should automatically select the right USB port but you can check it in the Tools >> Port menu.
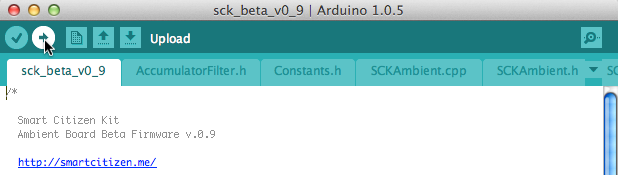
Now you just need to click the Upload button and Arduino will do the rest for you!
In case you have any issue please check the Arduino Troubleshooting guide.
Registering the kit in the platform
After you’ve uploaded your settings, don’t forget to register your kit in our database by saving it’s mac address. To find the mac address, you can use the serial command “get mac” by following the section The Serial Way. Or have a look at the wifi module on the board and read the serial number under the bar code (something like “131G0006662116E4” on kit v1.0 or “0006662116E4” on kit v.1.1).
The mac address is the last 12 digit of this serial, separated by a colon every two number. From a number like 0006662116E4 you would write 00:06:66:21:16:E4.
In both cases, you have to fill the mac address input field in the configuration page of your kit and press the save button.
You are now done with the manual configuration of your SCK. Wait for a few minutes to see your data coming on the server and being displayed on the web page. You can also check that everything is ok by looking the output of your kit via the Arduino serial monitor.
If you encounter any issue, please share your problem on the forum
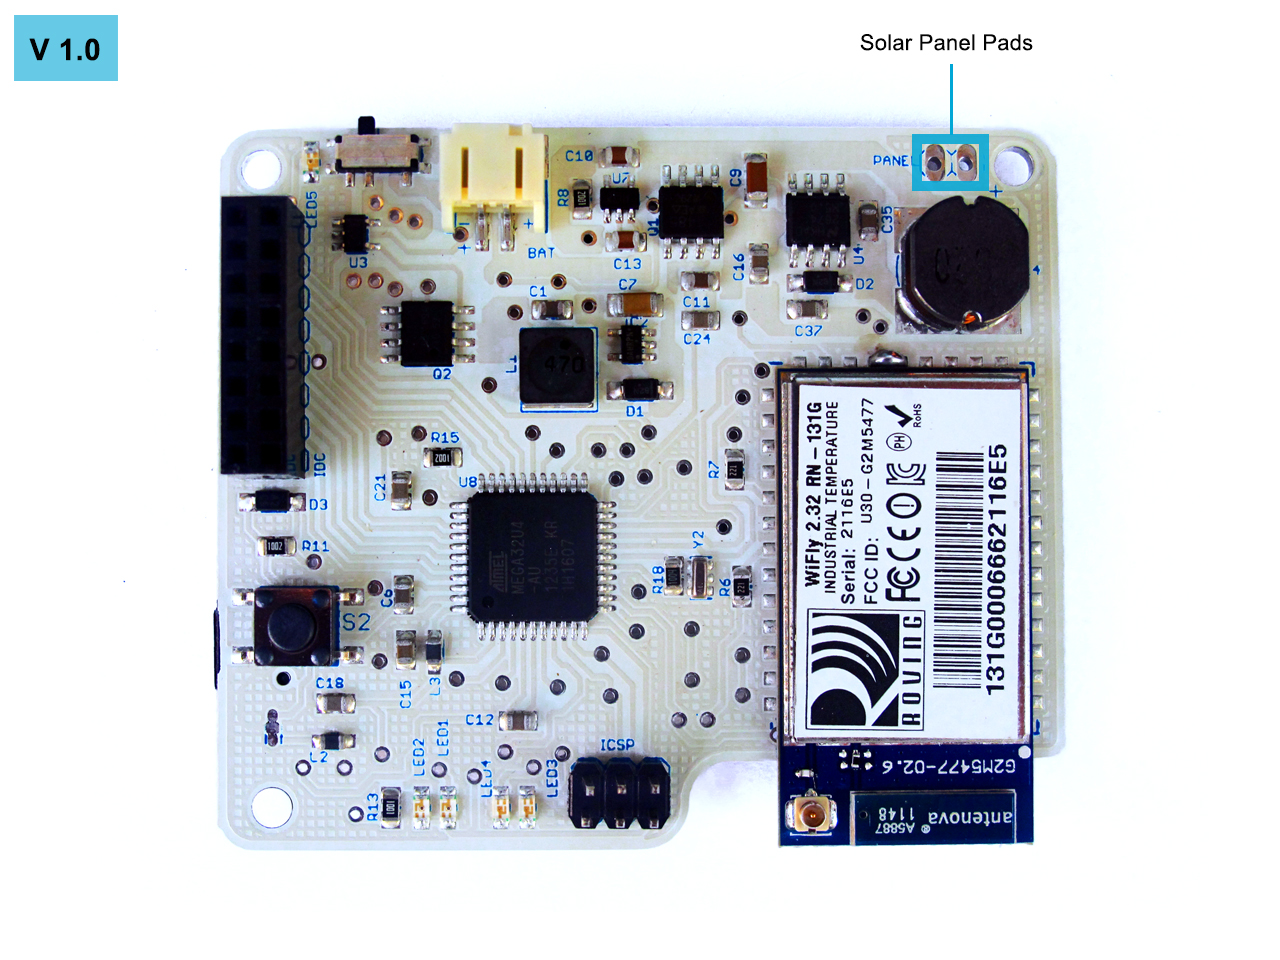
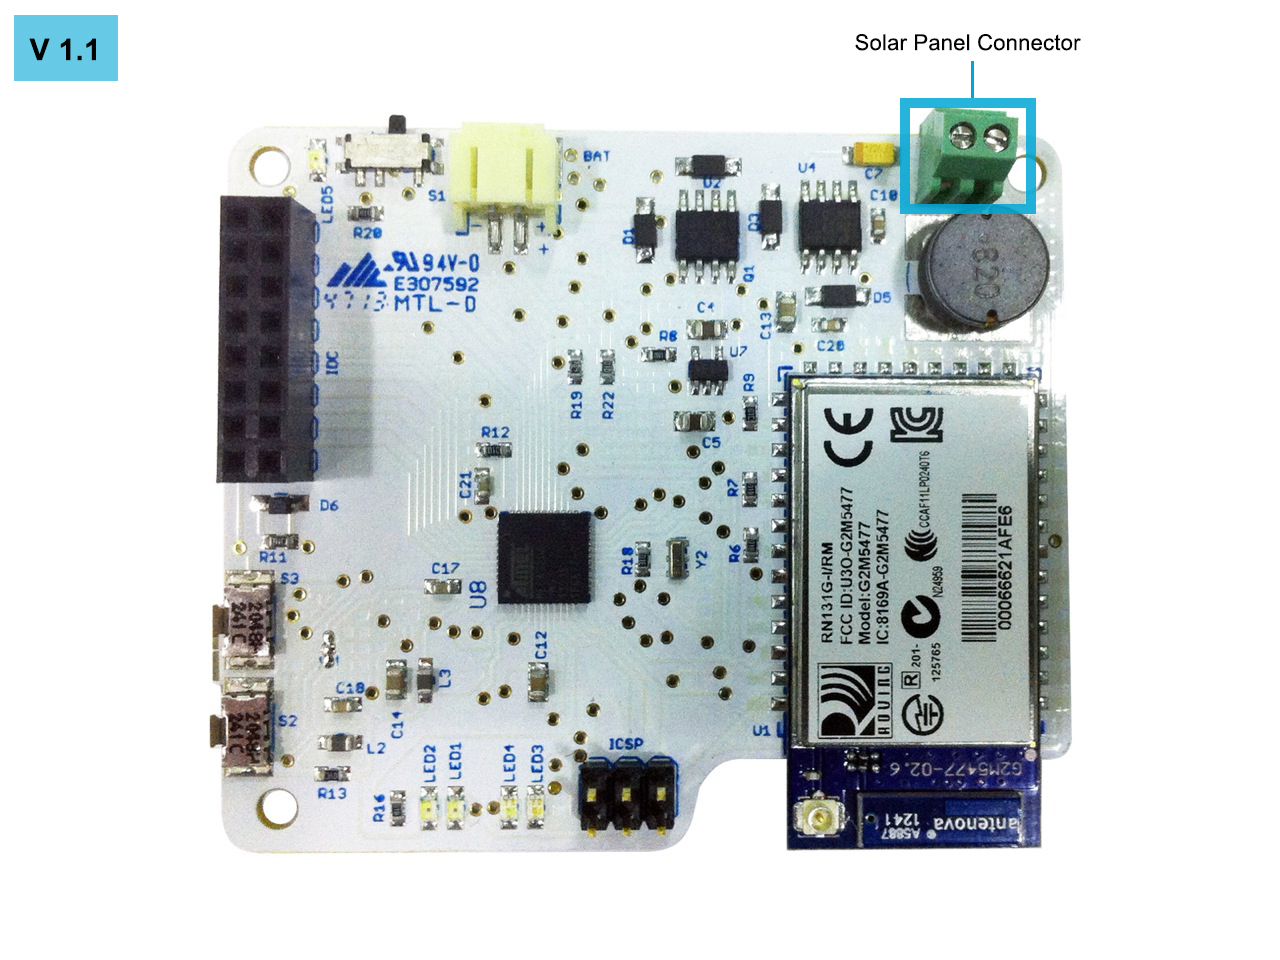
Attaching the solar panel
The solar panel should fulfill the specification of a voltage bigger than 8v and less than 15v, 12v is the recommended voltage, and a minimum of 500mA.
In order to attach the solar panel you have to solder the cables of the solar panel to the pads marked in the next image for version 1.0 of the SCK. For version 1.1 you have to connect the cables to the connector marked in the next image.
In both versions, yo have to attach the plus of solar panel to the plus pad of the SCK, and the minus of the solar panel to the minus pad of the SCK.