# Using the Shell
The SCK (from V2.0 onwards) has an integrated command shell over USB to manage all the kits functionalities. In this guide, we will cover how to access to this functionality in different platforms, and some examples!
If you are using a [webusb compatible browser](https://developer.mozilla.org/en-US/docs/Web/API/USB#browser_compatibility), you can use the terminal below and access the shell right off-the-shelf!
!!! warning "Monitor command"
The `monitor` command only works if you change the `Settings > Line ending` to `\n`.
## What is it?
The `shell` is a text-based interface to access almost any SCK functionality. In terms of hardware, it relies on the [serial communication](https://en.wikipedia.org/wiki/Serial_communication) between the SCK and your computer, so any **decent** USB cable connected between them will do.
## How to access it?
You can access the shell in different ways. The easiest is via [webUSB](#using-webusb), although you need a compatible browser. Otherwise, the [Arduino IDE](#using-the-arduino-ide) is a great option! For more advanced users, a [terminal interface](#using-a-terminal-directly) will work best.
### Using the Arduino IDE
Download and install the [Arduino IDE](https://www.arduino.cc/en/Main/Software) if you don't have it yet. Next, launch it and select the port under `Tools > Port >`:
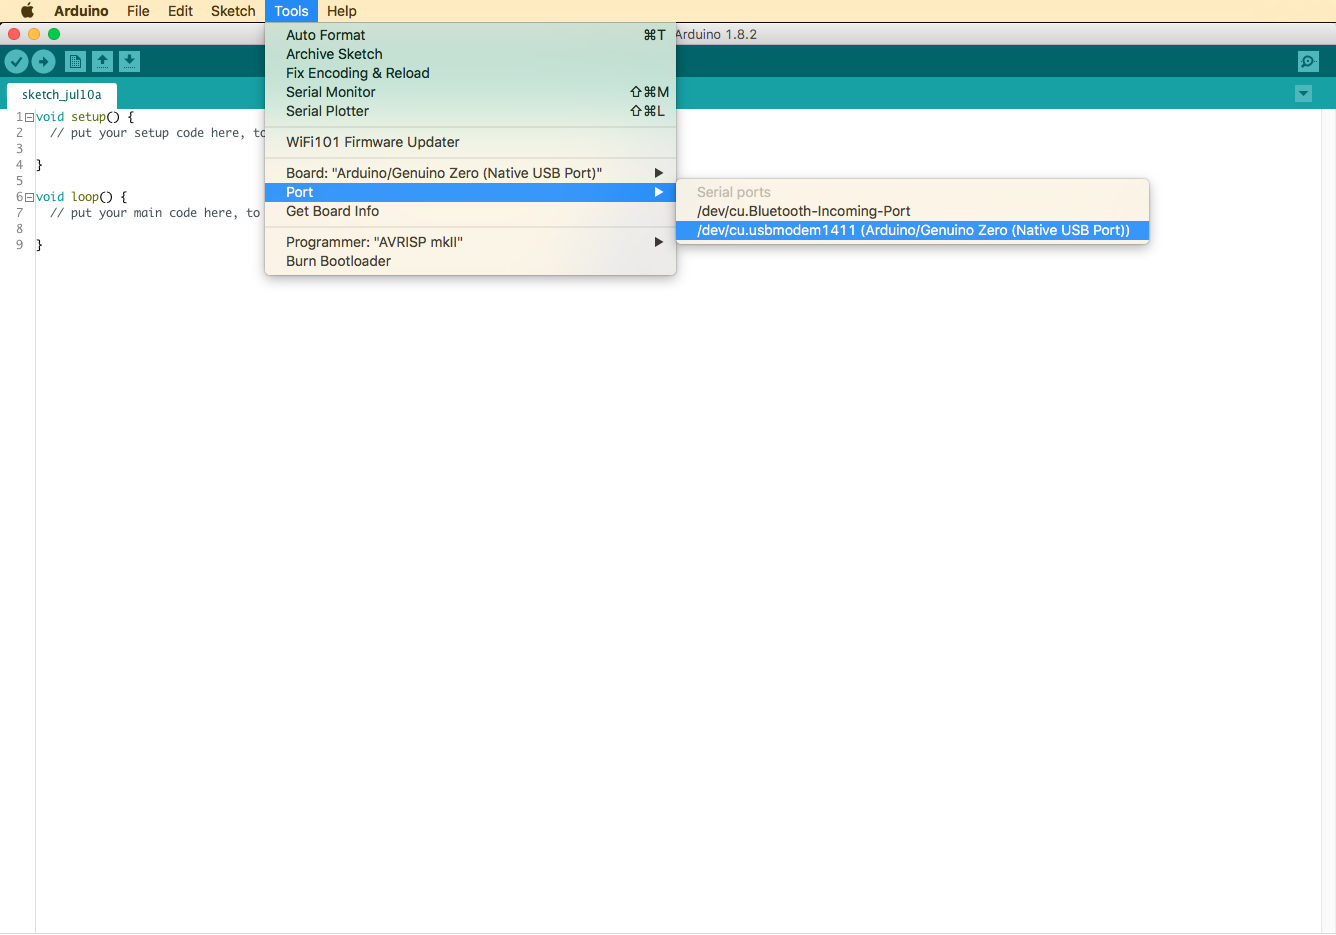
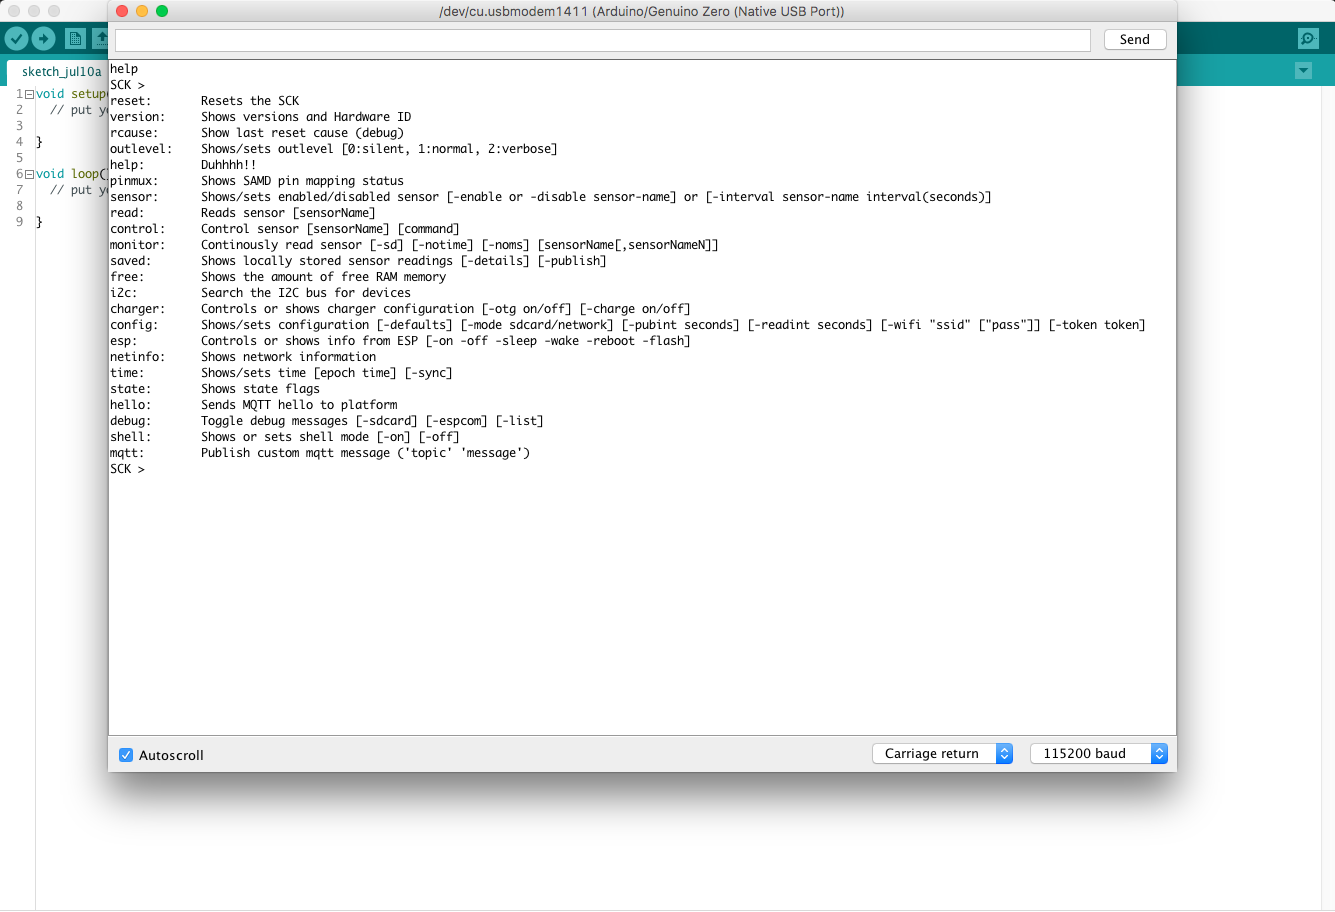
Launch the `Serial Monitor` under `Tools > Serial Monitor`. Make sure that the dropdowns in the bottom are set as in the image below (`Carriage return`).
Type in `help` to get started:
### Using WebUSB
You can use a terminal running on the browser, using the `WebUSB` technology (see above for a working example!). There are plenty of web services, such as [spacehuhn webserial terminal](https://serial.huhn.me/).
!!! warning "Not for all browsers"
Not all browsers support this at the moment. You can check its compatibility [here](https://developer.mozilla.org/en-US/docs/Web/API/USB#browser_compatibility).
### Using a terminal directly
More advanced users would probably rather use a more _rugged_ interface. In this case, you could use `screen` in your terminal of choice:
```
> ls /dev/cu | grep usb
cu.usbmodem1411
tty.usbmodem1411
> screen /dev/cu.usmodem1411
SCK >
...
```
If you already installed [platformio](https://platformio.org/) to [edit the firmware](https://docs.smartcitizen.me/guides/firmware/edit-the-firmware.md) you can use it here, too
```
> pio device monitor
SCK >
...
```
Finally, if you are a `linux` user, you can use [`tio`](https://github.com/tio/tio):
```
> tio /dev/ttyACM0
[14:06:45.050] tio v2.5
[14:06:45.050] Press ctrl-t q to quit
[14:06:45.109] Connected
SCK >
```
!!! warning "Be patient!"
The port will take a little time to appear in your list of devices. Normally the LED of your SCK will be **breathing white** during that period.
## Available commands
Type `help` to get an explanation of each command available:
```
SCK > help
reset: Resets the SCK
version: Shows versions and Hardware ID
rcause: Show last reset cause (debug)
outlevel: Shows/sets output level: outlevel [0:silent, 1:normal, 2:verbose]
help: Duhhhh!!
pinmux: Shows SAMD pin mapping status
flash: Shows and manage flash memory state [no-param -> info] [-format (be careful)] [-dump sect-num (0-2040)] [-sector sect-num] [-recover sect-num/all net/sd]
sensor: Shows/sets sensor state or interval: sensor sensor-name [-enable or -disable] [-interval interval(seconds)]
monitor: Continously read sensor: monitor [-sd] [-notime] [-noms] [sensorName[,sensorNameN]]
debug: Toggle debug messages: debug [-sdcard] [-flash] [-speed] [-serial]
read: Reads sensor: read [sensorName]
control: Control sensor: control [sensorName] [command]
free: Shows the amount of free RAM memory
i2c: Search the I2C bus for devices
power: Controls/shows power config: power [-info (extra info)] [-batcap mAh] [-otg on/off] [-charge on/off] [-sleep min (0-disable)]
config: Shows/sets configuration: config [-defaults] [-mode sdcard/network] [-pubint seconds] [-readint seconds] [-wifi "ssid" ["pass"]] [-token token] [-sanity(reset) on/off]
esp: Controls or shows info from ESP: esp [-on -off -sleep -wake -reboot -flash]
netinfo: Shows network information
time: Shows/sets date and time: time [epoch time] [-sync]
hello: Sends MQTT hello to platform
shell: Shows or sets shell mode: shell [-on] [-off]
publish: Publish custom mqtt message: mqtt ["topic" "message"]
offline: Configure offline periods and WiFi retry interval: [-retryint seconds] [-period start-hour end-hour (UTC 0-23)]
mqttsrv: Configure mqtt server address and port: [-host serverName] [-port portNum]
ntpsrv: Configure ntp server address and port: [-host serverName] [-port portNum]
sleep: Send the kit to sleep
led: Changes led brightness: led [percent]
file: SD card file operations: [-ls] [-rm filename] [-less filename] [-allcsv]
```
### Shell Mode - `shell`
```
shell: Shows or sets shell mode: shell [-on] [-off]
```
The SCK outputs _a lot of information_ via serial. This can be sometimes confusing while typing commands. You can silent it a bit with this command:
```
SCK > shell -on
Shell mode: on
```
!!! warning ""
This will turn your **LED static yellow**, and no output except responses to your commands will be given.
Remember to turn it off after you are done experimenting!
```
SCK > shell -off
Shell mode: off
```
### Set the recording configuration - `config`
```
config: Shows/sets configuration: config [-defaults] [-mode sdcard/network] [-pubint seconds] [-readint seconds] [-wifi "ssid" ["pass"]] [-token token] [-sanity(reset) on/off]
```
If you want to change your recording mode to, for instance, `sdcard` mode, you could do so by typing:
```
SCK > config -mode sdcard
```
To set it up in `network` mode:
```
SCK > config -mode network -wifi "SSID" "PASSWORD" -token 123456
```
!!! warning
Note that the token is not between quotes since it's always 6 digits.
To modify your Wi-Fi credentials:
```
SCK > config -wifi "NEWSSID" "NEWPASSWORD"
```
You can check your current configuration by typing `config`:
```
SCK > config
Mode: sdcard
Publish interval: 60
Reading interval: 60
Wifi credentials: not configured
Token: not configured
Mac address: 11:22:33:44:55:66
```
#### Set recording and publication intervals
In order to understand the reading and publication intervals, we first need to describe how measurements are taken:
1. **General reading interval**: this defines the _general_ period that the **SCK** uses to take measurements
2. **Individual sensor reading interval**: period for **each sensor**. It is defined as N times the _General reading interval_
3. **Publication interval**: period for the **SCK** to publish to the Smart Citizen Platform, independent of the reading interval.
Each sensor interval can be configured independently. By default, readings are requested to all sensors every 60s, except the PM sensor, which is read every 5 minutes to save battery.
The default **publication interval to the Smart Citizen Platform is 3 minutes**.
!!! info "Battery calculator"
This configuration option is very interesting to be used for battery saving. Make sure you check the [battery calculator](https://docs.smartcitizen.me/hardware/kit/features.md#battery-calculator)
All these intervals can be configured using the shell interface. For instance, to set the publication interval to every 10 minutes, we do:
```
config -pubint 600
```
Or to set the reading interval to every 3 minutes:
```
config -readint 180
```
Or both at 10 minutes:
```
config -pubint 600 -readint 600
```
#### Sensor based reading interval
```
sensor: Shows/sets sensor state or interval: sensor sensor-name [-enable or -disable] [-interval interval(seconds)]
```
To configure one specific sensor, remember that it's rounded to the _closest multiple_ of the _general reading interval_:
```
SCK > sensor temp -interval 360
The sensor read interval is calculated as a multiple of general read interval (180)
Changing interval of Temperature to 360
Saved configuration on eeprom!!
```
For instance, if we try to do set the temperature readings at 1.5 times, we will get:
```
SCK > sensor temp -interval 240
The sensor read interval is calculated as a multiple of general read interval (180)
Changing interval of Temperature to 180
Saved configuration on eeprom!!
```
!!! warning "Limitations"
1. The minimum reading and publication interval is 30s
2. The maximum reading interval is one hour
3. The maximum publication interval is one hour
For more customisation, please contact [support@smartcitizen.me](mailto:support@smartcitizen.me) or post on the [forum](https://forum.smartcitizen.me).
!!! warning "Default configuration"
To reeturn to the default configuration:
```
config -defaults
-- New config --
Mode: not configured
Publish interval (s): 180
Reading interval (s): 60
Wifi credentials: not configured
Token: not configured
Sanity reset (every 24 hours) is: on
** Please reset your kit **
```
And **reset** your kit.
### Disable `sanity reset` - `config`
The daily sanity reset is used to ensure the device reboots every day to avoid issues. However, in some cases it can can be disabled by:
```
SCK > config -sanity off
-- New config --
Mode: network
Publish interval (s): 180
Reading interval (s): 60
Wifi credentials: My Wi-Fi - mypassword
Token: ----
Mac address: AA:BB:CC:CC:BB:AA
Sanity reset (every 24 hours) is: off
```
You can enable it back on by:
```
SCK > config -sanity on
-- New config --
Mode: network
Publish interval (s): 180
Reading interval (s): 60
Wifi credentials: My Wi-Fi - mypassword
Token: ----
Mac address: AA:BB:CC:CC:BB:AA
Sanity reset (every 24 hours) is: on
```
To check, simply type `config`.
```
SCK > config
Mode: network
Publish interval (s): 180
Reading interval (s): 60
Wifi credentials: My Wi-Fi - mypassword
Token: ----
Mac address: AA:BB:CC:CC:BB:AA
Sanity reset (every 24 hours) is: on
```
### Get version data - `version`
```
version: Shows versions and Hardware ID
```
Check your **hardware and firmware version** data with the `version` command:
```
Hardware Version: 2.3
SAM Hardware ID: 105816085030524E572E3120FF12123C
SAM version: 0.9.10-88b69c2-master-sck23_air
SAM build date: 2025-01-31T12:34:45Z
ESP version: 0.9.9-6ffa643-master
ESP build date: 2025-01-29T13:05:48Z
```
### Get network information - `netinfo`
```
netinfo: Shows network information
```
Check your **network information** data with the `netinfo` command:
```
SCK > netinfo
Hostname: SmartcitizenA07C
IP address: 172.16.20.26
AP MAC address: EE:64:C9:E1:A0:7C
STA MAC address: EC:64:C9:E1:A0:7C
ESP version: 0.9.9-6ffa643-master
ESP build date: 2025-01-29T13:05:48Z
```
Explanation of each field:
- `Hostname`: Wi-Fi SSID and hostname
- `IP address`: SCK's local IP address
- `AP MAC address`: SCK's _access point_ MAC address
- `STA MAC address`: SCK's _station_ MAC address
- `ESP version`: Wi-Fi Antenna (ESP8266) firmware version
- `ESP build date`: Wi-Fi Antenna (ESP8266) firmware build date
### List/modify the active sensors - `sensor`
```
sensor: Shows/sets sensor state or interval: sensor sensor-name [-enable or -disable] [-interval interval(seconds)]
```
By typing in `sensor`, a **list of enabled and supported sensors** is displayed:
```
SCK > sensor
Disabled
----------
PM board Dallas Temperature
[...]
Enabled
----------
Temperature (60 sec)
Humidity (60 sec)
Battery (60 sec)
Light (60 sec)
Noise dBA (60 sec)
Barometric pressure (60 sec)
VOC Gas CCS811 (60 sec)
eCO2 Gas CCS811 (60 sec)
PM 1.0 (60 sec)
PM 2.5 (60 sec)
PM 10.0 (60 sec)
```
To **disable** one sensor (you can type the name partially or fully):
```
SCK > sensor Noise -disable
Disabling Noise dBA
Saved configuration on eeprom!!
```
To **enable** it (only works if it's detected):
```
SCK > sensor Noise -enable
Enabling Noise dBA
Saved configuration on eeprom!!
```
!!! warning "Only if detected!"
If the sensor you are trying to connect is not recognised, the SCK will complain:
```
SCK > sensor atlas -enable
Failed enabling Atlas Temperature
```
### Read sensor data once - `read`
```
read: Reads sensor: read [sensorName]
```
You can `read`` data from one sensor:
```
SCK > read Noise
Noise dBA: 53.85 dBA
```
### Read sensor data continuously - `monitor`
```
monitor: Continously read sensor: monitor [-sd] [-notime] [-noms] [sensorName[,sensorNameN]]
```
Or `monitor` it continuously:
```
SCK > monitor light
Time Miliseconds Light
2019-07-10T17:58:07Z 6 137
2019-07-10T17:58:07Z 98 137
2019-07-10T17:58:07Z 98 136
2019-07-10T17:58:07Z 98 137
2019-07-10T17:58:07Z 108 137
2019-07-10T17:58:07Z 98 137
2019-07-10T17:58:07Z 98 137
2019-07-10T17:58:07Z 108 137
2019-07-10T17:58:07Z 98 137
2019-07-10T17:58:08Z 98 137
2019-07-10T17:58:08Z 108 137
2019-07-10T17:58:08Z 98 136
...
```
!!! success "Log monitor data on the SD card"
Adding the `-sd` option will store data into a `MONITOR.TXT` file on the SD card:
```
SCK > monitor -sd light
Time Miliseconds Light
2019-07-10T17:58:07Z 6 137
2019-07-10T17:58:07Z 98 137
2019-07-10T17:58:07Z 98 136
2019-07-10T17:58:07Z 98 137
2019-07-10T17:58:07Z 108 137
2019-07-10T17:58:07Z 98 137
2019-07-10T17:58:07Z 98 137
2019-07-10T17:58:07Z 108 137
2019-07-10T17:58:07Z 98 137
2019-07-10T17:58:08Z 98 137
2019-07-10T17:58:08Z 108 137
2019-07-10T17:58:08Z 98 136
...
```
You can `monitor` several sensors at the same time, separating the names by comma:
```
SCK > monitor light, temp
Time Miliseconds Light Temperature
2019-07-10T17:58:07Z 6 137 23.2
2019-07-10T17:58:07Z 98 137 23.2
2019-07-10T17:58:07Z 98 136 23.2
2019-07-10T17:58:07Z 98 137 23.2
2019-07-10T17:58:07Z 108 137 23.2
2019-07-10T17:58:07Z 98 137 23.2
2019-07-10T17:58:07Z 98 137 23.3
2019-07-10T17:58:07Z 108 137 23.3
2019-07-10T17:58:07Z 98 137 23.3
2019-07-10T17:58:08Z 98 137 23.2
2019-07-10T17:58:08Z 108 137 23.2
2019-07-10T17:58:08Z 98 136 23.2
...
```
You can also monitor all of them at the same time (slow):
```
SCK > monitor
Time Miliseconds Battery Light Temperature Humidity Noise dBA Barometric pressure VOC Gas CCS811 eCO2 Gas CCS811 PM 1.0 PM 2.5 PM 10.0
2019-07-11T09:13:04Z 5 37 137 28.75 57.72 1.5 101.29 1.00 408.00 1.5 1.5 1.5
2019-07-11T09:13:07Z 3195 37 138 28.78 57.65 1.5 101.30 1.00 408.00 1.5 1.5 1.5
2019-07-11T09:13:08Z 694 37 136 28.77 57.62 1.5 101.29 1.00 408.00 1.5 1.5 1.5
```
If you don't need to output the `miliseconds` column (the time since last reading):
```
SCK > monitor -noms light
Time Light
2019-07-10T17:58:58Z 136
2019-07-10T17:58:58Z 136
2019-07-10T17:58:58Z 137
2019-07-10T17:58:58Z 137
2019-07-10T17:58:59Z 136
...
```
Or the `timestamp`:
```
SCK > monitor -notime light
Miliseconds Light
6 137
98 137
98 137
99 137
108 137
...
```
Or both:
```
SCK > monitor -noms -notime light
Light
136
136
137
137
136
...
```
!!! warning
If your kit has no time configured (the LED should be flashing), the output would look like:
```
SCK > monitor Noise
Time Miliseconds Noise dBA
0 1 52.83
0 187 50.36
0 187 52.05
0 187 51.95
0 187 48.28
0 187 48.72
0 187 50.81
...
```
!!! info "Pipe data into a file"
In a more advanced case, you can _pipe_ the output to a file. For instance, in your terminal (using a mac) you could do:
```
> echo "monitor pm light" > /dev/cu.usbmodem1411 && screen -L /dev/cu.usbmodem1411
```
Then, if we check the contents of the file (normally something like `screenlog.X`):
```
monitor light
Time Miliseconds Light
2019-07-11T09:10:05Z 6 141
2019-07-11T09:10:05Z 98 141
2019-07-11T09:10:05Z 99 141
2019-07-11T09:10:05Z 98 141
2019-07-11T09:10:05Z 108 141
2019-07-11T09:10:05Z 98 141
2019-07-11T09:10:05Z 98 141
2019-07-11T09:10:05Z 98 141
2019-07-11T09:10:06Z 98 141
2019-07-11T09:10:06Z 98 141
2019-07-11T09:10:06Z 108 141
2019-07-11T09:10:06Z 98 141
2019-07-11T09:10:06Z 98 141
...
```
This can be useful in case you want to log data as fast as possible, with little delay between readings (~100ms).
### Modify sensor specific parameters - `control`
Each sensor has potentially parameters than can be customized, which are accessed by the `control` command. For any sensor, you can do:
```
control temperature
```
And it will show you available commands. As an example, we show the temperature and relative humidity offset below.
#### Modify temperature and relative humidity offset - `control`
Starting in firmware `0.9.11`, we have included a command to `control` temperature and relative humidity offsets for [Sensirion SHT3X](https://docs.smartcitizen.me/knowledge/air/temperature_rel_humidity/Sensirion_SHT3X.md) sensors, present in the [Urban Board](https://docs.smartcitizen.me/hardware/boards/urban-board.md) or as [an external probe](https://docs.smartcitizen.me/knowledge/air/temperature_rel_humidity/Sensirion_SHT3X-weatherproof.md), for both the `SHT31` and the `SHT35` type. This feature allows introducing an offset to both variables: temperature and relative humidity. This offset can be used to compensate for heat build-up on the device. Note that this offset is the same for [wi-fi / online](https://docs.smartcitizen.me/hardware/kit/features.md#wi-fi-mode) or [sd-card / offline](https://docs.smartcitizen.me/hardware/kit/features.md#sd-card-mode) modes. In addition, a small adjustment is *hardcoded* to compensate for battery charging additional heat up **only on the urban board**.
To check available commands (note that you can change `temp` or `hum` for the urban board):
```
SCK > control temp
Temperature:
Available commands:
* cal: [float - clear] Sets temperature offset with respect to current offset or clears it
```
To check the offset currently implemented:
```
SCK > control temp cal
Current temperature offset: -1.00 (degC)
```
```
SCK > control hum cal
Current humidity offset: 3.50 (rh)
```
!!! info "Default offsets"
These offsets are calibrated based on internal tests on each hardware version. You can always modify them to suit your needs, or revert back to the default with `control temp cal clear` or `control hum cal clear`.
To modify, you can issue the `control temp cal` command followed by a the offset to add in float notation (for instance `-10.0`):
Check the calibration and read the current value:
```
SCK > control temp cal
Temperature: cal
Current temperature offset: -1.00 (degC)
SCK > read temp
Temperature: 25.95 C
```
Set the temperature offset to -10.0 degC. Note that for the previous reading, there was already an offset of `-1.00 degC`, so now the offset will be -11.0 degC:
```
SCK > control temp cal -10.00
Temperature: cal -10.00
SCK > control temp cal
Current temperature offset: -11.00 (degC)
SCK > read temp
Temperature: 15.96 C
```
To revert to the previous value:
```
SCK > control temp cal clear
Set default offset: -1.00 (degC)
SCK > control temp cal
Current temperature offset: -1.00 (degC)
SCK > read temp
Temperature: 26.09 C
```
As an example, other sensors can be also modified. For instance, for humidity:
```
control hum cal
Current humidity offset: 3.50 (rh)
SCK > read hum
Humidity: 63.06 %
```
Finally, external sensors, connected via the [auxiliary port](https://docs.smartcitizen.me/hardware/kit/features.md#auxiliary-connector) can also be modified.
```
SCK > control ext sht31 temp cal
Ext SHT31 Temperature: cal
Current temperature offset: 0.00 (degC)
```
```
SCK > control ext sht31 temp cal -2.00
Ext SHT31 Temperature: cal -2.00
Temperature offset set to -2.00 degC
```
```
SCK > control ext sht31 temp cal clear
Ext SHT31 Temperature: cal clear
Set default offset: 0.00 (degC)
```
!!! info "Default value"
The default value for external sensors is 0degC and 0 %RH.
### Changing mqtt or ntp servers - `mqttsrv` / `ntpsrv`
```
mqttsrv: Configure mqtt server address and port: [-host serverName] [-port portNum]
ntpsrv: Configure ntp server address and port: [-host serverName] [-port portNum]
```
If you want to send data to your own server, or there is a firewall in your network, you can use these two commands to change both NTP or MQTT server.
You can check the MQTT server with `mqttsrv`:
```
SCK > mqttsrv
Mqtt Host: mqtt.smartcitizen.me
Mqtt Port: 1883
```
You can check the NTP server with `ntpsrv`:
```
SCK > ntpsrv
NTP Host: ntp.smartcitizen.me
NTP Port: 80
```
Change `mqttsrv` `host` and `port`:
```
SCK > mqttsrv -host mqtt.greatcity.me -port 80
Mqtt Host: mqtt.greatcity.me
Mqtt Port: 80
```
!!! info "Check the payload first!"
Check how we send data (note it's not a standard JSON):
```
{
t:ISO8601 Timestamp,
:,
...
}
```
Example:
```
{
t:2017-03-24T13:35:14Z,
29:48.45,
13:66,
12:28,
10:4.45
}
```
### Accessing the flash memory - `flash`
```
flash: Shows and manage flash memory state [no-param -> info] [-format (be careful)] [-dump sect-num (0-2040)] [-sector sect-num] [-recover sect-num/all net/sd]
```
!!! danger ""
This is an advanced feature and helps to explore the data stored in the onboard flash memory for debugging purposes.
Get a complete map of used sectors in the flash memory:
```
SCK > flash
Scanning Flash memory (it can take a while!)
0 > |u38(_/_)|u36(_/_)|u34(_/_)|u35(_/_)|u35(_/_)|u34(_/_)|u34(_/_)|u35(_/_)|u37(_/_)|u37(_/_)|u37(_/_)|u36(_/_)|u36(_/_)|u36(_/_)|u36(_/_)|u36(_/_)|u36(_/_)|u36(_/_)|u36(_/_)|u36(_/_)|u36(_/_)|u36(_/_)|u36(_/_)|u36(_/_)|u36(_/_)|u36(_/_)|u36(_/_)|u36(_/_)|u36(_/_)|u37(_/_)|u37(_/_)|u37(_/_)|
32 > |u37(_/_)|u36(_/_)|u36(_/_)|u36(_/_)|u36(_/_)|u37(_/_)|u37(_/_)|u37(_/_)|u37(_/_)|u37(_/_)|u37(_/_)|u37(_/_)|u37(_/_)|u37(_/_)|u37(_/_)|u37(_/_)|u37(_/_)|u37(_/_)|u37(_/_)|u37(_/_)|u37(_/_)|u37(_/_)|u37(_/_)|u37(_/_)|u37(_/_)|u37(_/_)|u37(_/_)|u37(_/_)|u37(_/_)|u37(_/_)|u37(_/_)|u36(_/_)|
...
```
Format the flash (will take a long time):
```
flash -format
```
Check a sector (see what's inside):
```
SCK > flash -sector 300
Sector 300 in address 1228800 is: Used
Sector 300 fully published to network: true
Sector 300 fully published to sd-card: true
Net published groups: 37
Net un-published groups: 0
Sd saved groups: 37
Sd not saved groups: 0
Total groups: 37
Freespace: 53 bytes
First group: 2021-07-08T09:04:19Z
Last group: 2021-07-12T07:34:49Z
```
Recover a sector (send it to the platform or save in sdcard, or both - see `help` command):
```
flash -recover all net
```
### Change the LED brightness - `led`
```
led: Changes led brightness: led [percent]
```
Change the `led` brightness by:
```
SCK > led 25
```
### SD card operations
```
file: SD card file operations: [-ls] [-rm filename] [-less filename] [-allcsv]
```
List SD card files:
```
SCK > file -ls
```
Remove a file in the SD card:
```
SCK > file -rm 2025-01-25.CSV
```
Print the content of one SD card file:
```
SCK > file -less 2025-01-25.CSV
```
Print all CSV files (long!):
List SD card files:
```
SCK > file -allcsv
```
## Advanced (but cool) example!
!!! example "Making most of the digital microphone"
- The digital microphone in your SCK uses an FFT algorithm to calculate the final sound pressure level (SPL) in different scales (A, C, Z). The FFT spectrum is also available for user analysis. Let's have a look!
- First, enable it with:
```
SCK > sensor fft -enable
Enabling Noise FFT
```
- Then, monitor and log it in a file with:
```
echo "monitor fft" > /dev/cu.usbmodem1411 && screen -L /dev/cu.usbmodem1411
```
- In this file, we will have something like:
```
12
15
19
20
0
...
12
23
2019-07-11T09:30:01Z 5 null
...
```
- The values between the dates are the actual FFT spectrum. We will now clean the lines with the dates and then plot the data. For this, we will use a `python` code to make things easier. You can download the code [here](https://docs.smartcitizen.me/assets/examples/spectrum_example.py).
- If we run this code in `python3` in the same folder where the screenlog from before is:
```
> python spectrum_example.py
```
We will have two outputs: a `csv` file with the spectrums in rows, and a png image that looks like this!
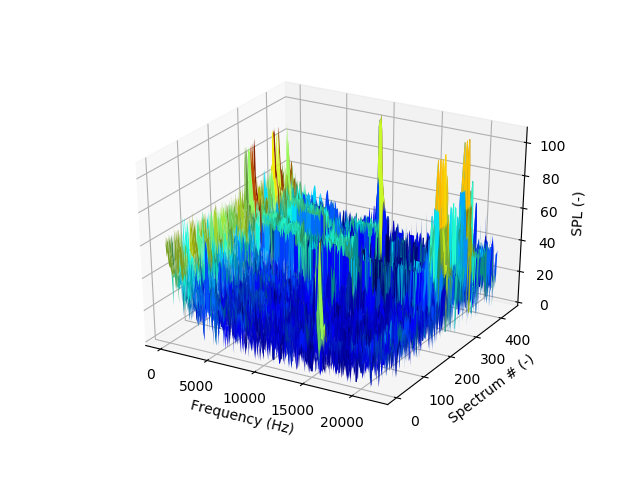
You can see that we were playing with a [tone generator](http://onlinetonegenerator.com/) to make some high pitch noises at 10kHz and 20kHz.