Troubleshooting
Add an SSID with two words
If your SSID has more than one word you have to fill any spaces with the dollar ($) character.
Serial port already in use
This happens when one application is already using the serial port. For example, if you have the Arduino IDE serial monitor opened and you're trying to configure your SCK through the web browser. You have yo close the serial monitor first.
No port available
This message will appear when you have uploaded the wrong firmware version to your SCK.
Unable to connect to the Board
This happens when one application is already using the serial port. For example, if you have the Arduino IDE serial monitor opened and you're trying to configure your SCK through the web browser. You have yo close the serial monitor first.
Unable to connect to the Internet
If you're getting the message "Error in connection" when you run the SCK firmware this may be due:
- Your router works with a protocol different than 802.11AG
- You have set wrong SSID name and/or password
- Your network has an encryption different than OPEN, WEP, WPA1, WPA2 OR WEP64
- Your firewall is blocking the mac address of your SCK
- Your internet connection is not stable
No data received yet
This message appears the first time you register your kit, is due to cache issues. This issue normally is fixed after a few hours, in any case we are working to improve this issue.
Port is not appearing on the drop down
This may be due:
- The SCK is turned off.
- The USB cable you're using has wired only power cable and not the data cables.
- The bootloader is corrupted.
Firmware update problem
If you're having problems updating the firmware you can try one of these two options:
- Update the latest firmware through the web browser configurator.
- Update the latest firmware through Arduino IDE.
If you're still having problems it's may be due to a hardware or software issue, contact us at support@smartcitizen.me.
No MAC address registered
If you're getting this message, the may be due:
- Configuration process is not finished correctly.
- The WIFI module of your SCK is corrupted, so MAC address is not accessible. To repair your wifi module refer to this tutorial.
Collapsed USB port
First batches of SCK version 1.1 came with this issue. We have a tutorial you can follow to repair it or contact us at support@smartcitizen.me.
Broken LiPo battery wire
Depending on the conditions, the battery wires can suffer until its break. We encourage you to read this Battery Common Care Techniques in order to preserve your battery.
Non-Stop Blue LED Blinking
If your blue LEDs are blinking back and forth non-stop, this means your SCK has lost its WiFi connection. Check to make sure your router is still on, and that you're still in range.
Reinstall the bootloader using another Arduino
In this tutorial we are going to show you how turn an Arduino into AVR ISP to burn the bootloader to your SCK.
The bootloader is a small piece of code running inside your Smart Smart Citizen Kit allowing it to be programmed and configured over USB. If suddenly you do not see anymore the USB / Serial port when connecting your Kit to a Computer maybe your bootloader crashed and it is time to reinstall it.
Parts:
Software:
Instructions:
- Open the ArduinoISP sketch example in menu
File > Examples > ArduinoISP. - Select the correct board and ports in the menu
Tools > Board > PortandTools > Board > Portthat correspond to the board you are using as the programmer (e.g., Arduino UNO). - Upload the ArduinoISP sketch.
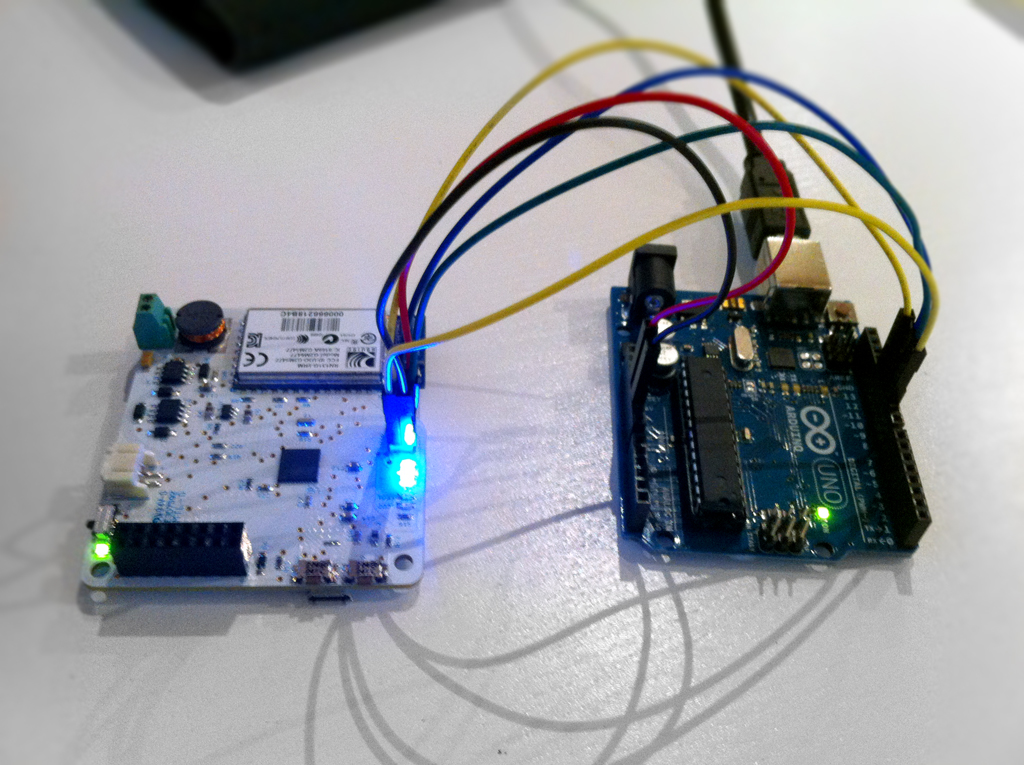
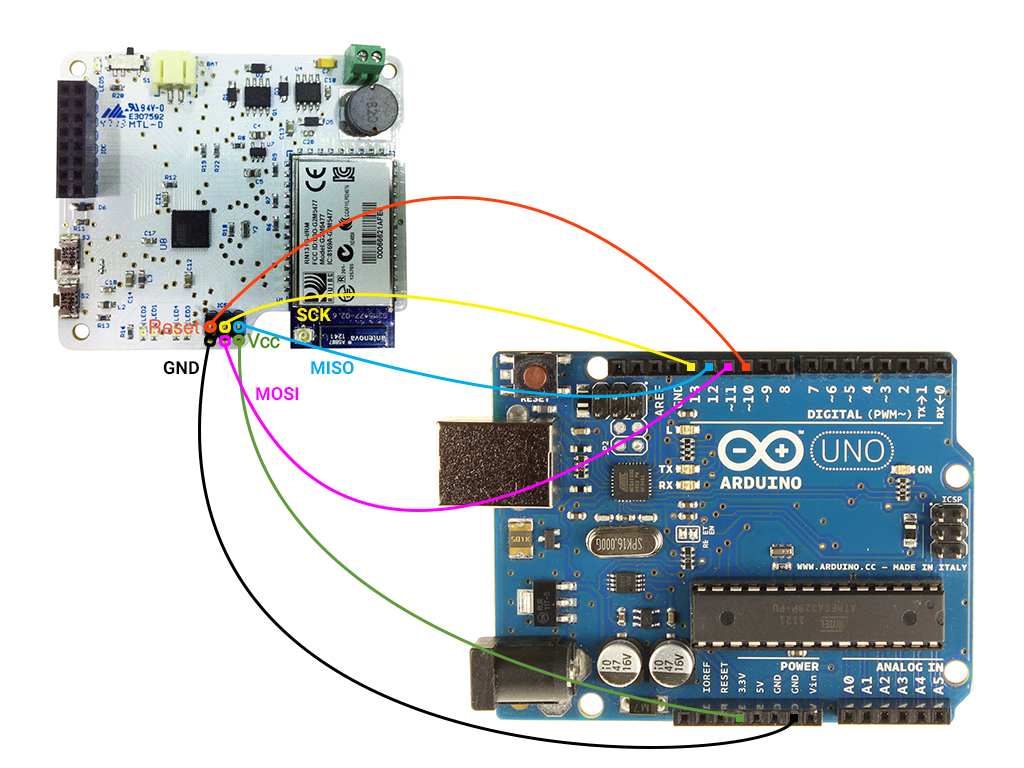
- Wire your Arduino board to the SCK as shown in the diagram below using the Patch cables.
Take care the ISCP VCC goes to the 3.3V Pin on the Arduino UNO since the Smart Smart Citizen Kit works at 3.3V
-
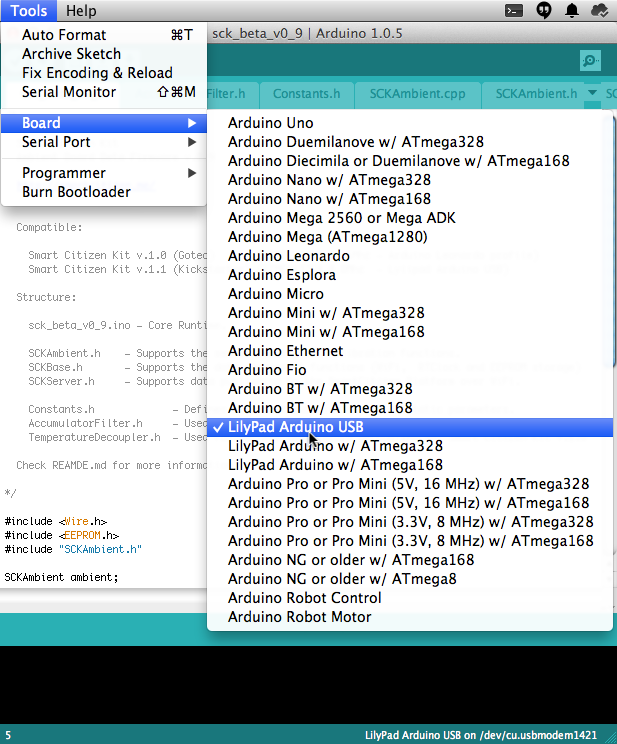
Select the board in the
Tools > Board menu- For SmartSmart Citizen Kit version 1.0 select Arduino Leonardo (ATmega 32U4 at 16Mhz)
- For SmartSmart Citizen Kit version 1.1 select Arduino LilyPad USB (ATmega 32U4 at 8Mhz)
-
Select in
Tools > Programmer > Arduino as ISP. - Select in
Tools > Burn Bootloader. This step can take some minutes. - Done! Please, go back to the on-line setup page in order to install the firmware again.
We know this is not an easy task! For any question contact support@smartcitizen.me or ask for help in the forum.
Reinstall the bootloader using the AVRISP MKII
In this tutorial we are going to show you how to program the SCK with the Atmel AVRISP MKII In-System Programmer. This is not a common tool you might have but we suggest you ask your closest Fab Lab.
The bootloader is a small piece of code running inside your Smart Smart Citizen Kit allowing it to be programmed and configured over USB. If suddenly you do not see anymore the USB / Serial port when connecting your Kit to a Computer maybe your bootloader crashed and it is time to reinstall it.
Parts:
Software:
Instructions:
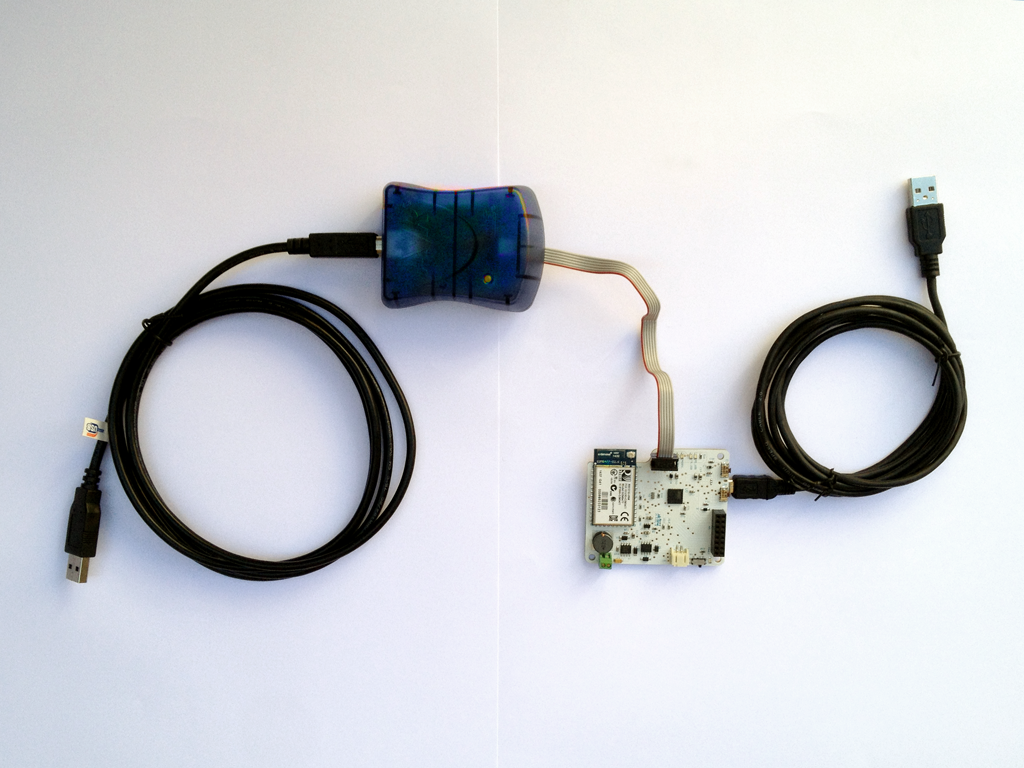
- Connect the AVRISP mkII with the USB cable to the computer.
- Connect your Smart Smart Citizen Kit to the computer with the micro-USB cable.
- Connect the six pins bus cable of the AVRISP mkII to the ISP connector of the SCK Board as shown the picture.
- Switch on your Smart Smart Citizen Kit, you'll find out a tiny switch in one side.
- Select the board in the
Tools > Board menu- For SmartSmart Citizen Kit version 1.0 select Arduino Leonardo (ATmega 32U4 at 16Mhz)
- For SmartSmart Citizen Kit version 1.1 select Arduino LilyPad USB (ATmega 32U4 at 8Mhz)
- Select in
Tools > Programmer > AVRISP MKII. - Select in
Tools > Burn Bootloader. This step can take some minutes, the led AVRISP mkII will blink and after go green. - Done! Please, go back to the on-line setup page in order to install the firmware again.
We know this is not an easy task! For any question contact support@smartcitizen.me or ask for help in the forum .