FAQ
How do I register again my SCK?
It is really important to understand a SCK can be just registered one time to one device in the platform.
Imagine how confusing it will be a single physical device publishing as two separate kits on the platform in two different locations!
That's why you will need to unlink your SCK before you can register it again as another kit or when you would like to give your device to someone else to use it.
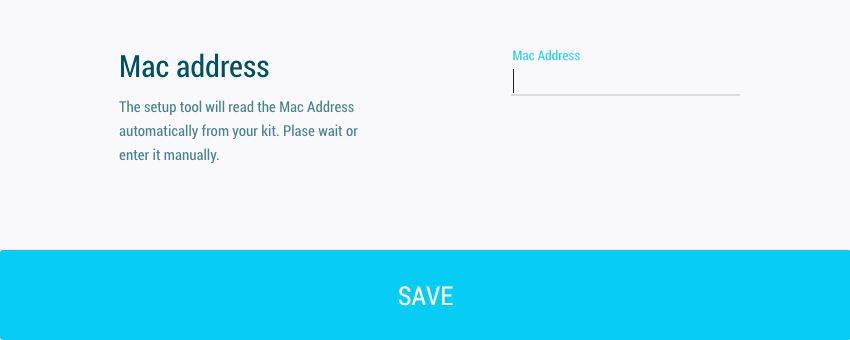
Go to your Kits profile page select the kit you will like to unlink and go to Setup. You don't need to connect your SCK, just scroll down, remove the Mad Address number from the field and click Save.
This way your kit will keep all the data on the platform but you will be able to register your SCK again as another kit. You can alway register again your SCK on the same device by following the standard setup process.
Is my home wireless internet going to work with the SCK?
The Smart Smart Citizen Kit is designed to work with most home and office standard Wi-Fi routers and access points. However we do not support network names or passwords longer than 19 characters or with a $ character.
We also do not support WPA Enterprise networks or Captive portal log in as the ones on some big companies and airports. We suggest you contact your IT support team, they can enable you special access in the network based on your device Mac Address.
How to use the SD Card?
-
microSD: We recommend formatting micro SD cards using the official SD tool you can download here.
-
RTC: Place a CR1220 cell battery on your kit. Before uploading the SD firmware use the on-line configuration tool at smartcitizen.me to set your Wi-Fi credentials. Turn your kit off and on for a minute, the blue led's will blink and your kit will connect to the internet and sync its the internal clock with our remote servers. Once the time is set the cell battery will keep SCK time in sync for more than 4 years.
-
You can now install the SD firmware using the Arduino IDE.
Dependencies:
-
In order to compile and upload the firmware you will need to install the SdFat library for Arduino.
-
Download the library here and install the library following the instructions.
Boards:
-
For SmartSmart Citizen Kit version 1.0 select
Tools/Boards/Arduino Leonardoon the Arduino IDE (ATmega 32U4 at 16Mhz) -
For SmartSmart Citizen Kit version 1.1 select
Tools/Boards/Lylipad Arduino USBon the Arduino IDE (ATmega 32U4 at 8Mhz)
SD data format
When using the SD firmware on the SCK, data is stored as CSV (comma separated) file on the SD card.
This is an example of the output file once opened on a spreadsheet application:
| Temperature | Humidity | Light | Battery | Solar Panel | CO | NO2 | Noise | UTC |
|---|---|---|---|---|---|---|---|---|
| 2821.20 | 4072.00 | 4413.10 | 96.40 | 0.00 | 94.67 | 0.65 | 5.23 | 2000-01-01 00:00:02 |
| 2784.40 | 4236.80 | 5936.70 | 96.10 | 0.00 | 278.27 | 1.05 | 2.39 | 2000-01-01 00:00:02 |
Data Conversions
The data stored is automatically converted to the proper units in firmware.
If you prefer to do the conversions manually set DataRaw false in the Constants.h file and apply the formulas on the following table:
| ID | Sensor | Units | Conversion Formula |
|---|---|---|---|
| 0 | Temperature | ºC | T = -53 + 175.72 / 65536.0 * ( Traw * 10 ) |
| 1 | Humidity | %Rel | H = 7 + 125.0 / 65536.0 * ( Hraw * 10 ) |
| 2 | Light | Lux | L = Lraw / 10 |
| 3 | Battery | % | Not required |
| 4 | Panel | mV | Not required |
| 5 | CO | kOhm | Not required |
| 6 | NO2 | kOhm | Not required |
| 7 | Noise | dB | Apply the conversion table from mV to dB: CSV |
| 8 | Date | DD:MM:YY | Not required |
| 9 | Time | hh ss ss |
Not required |
How to import the SD card data?
Sorry, this is temporary disabled! We are working on a new release.
You can import the recorded data in to smartcitizen.me
In your device page you will find the Import SD along with the Edit and Configure options.
Using a microSD card reader get the post.csv file from your card, select it and click import. Data will be imported in to your device, data existing on the file already imported will be skipped. Your kit should be running the latest SD firmware and the SCK time (RTC) should be set in order data can be imported.
Is my kit publishing data properly?
Sorry, this is temporary disabled! We are working on a new release.
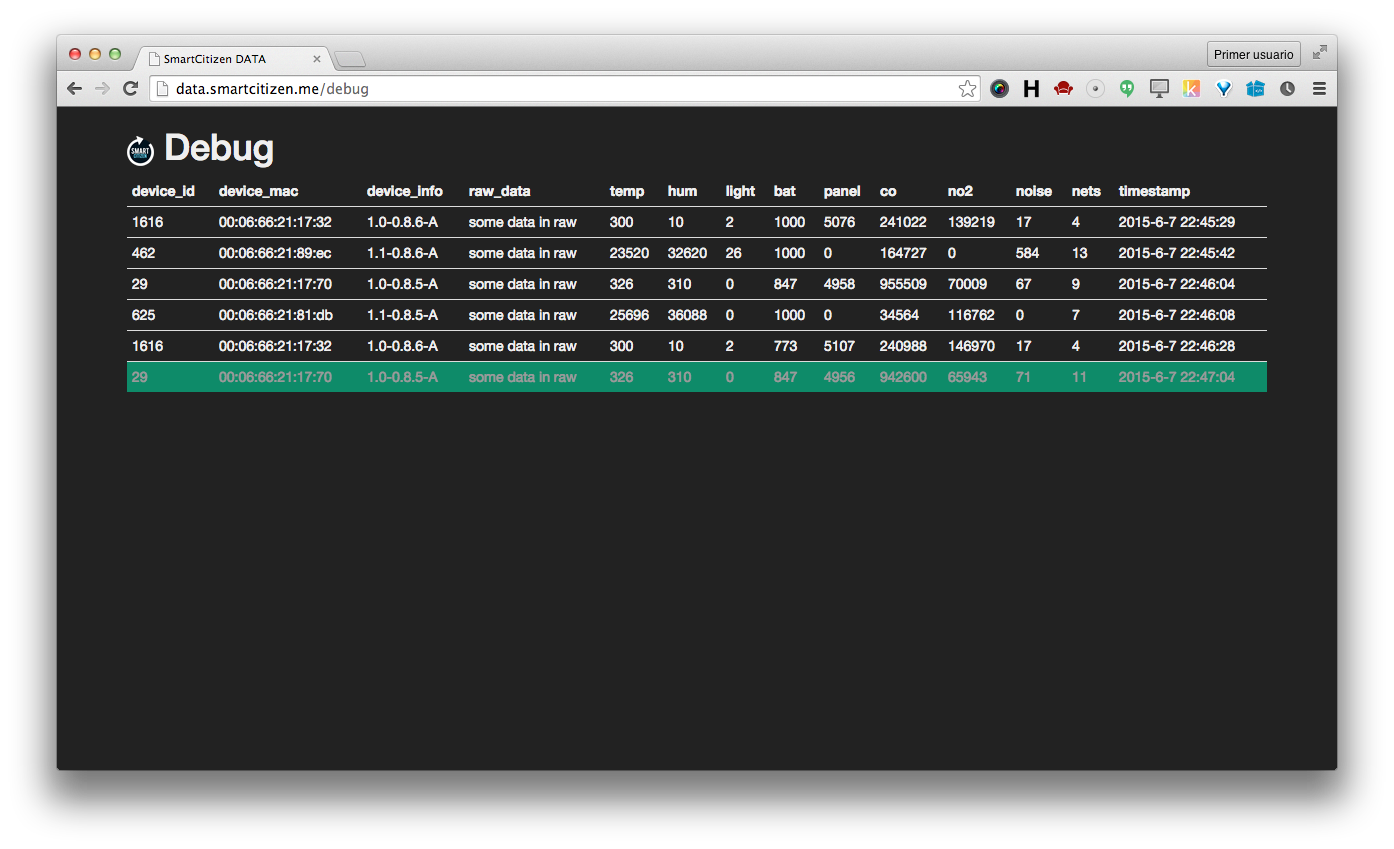
You can easily check each time your kit is publishing data to our platform in real time by enabling the debug mode on your device.
- Go to your device edit page in smartcitizen.me, set Debug Enabled and save it.
- Visit data.smartcitizen.me/debug you will see the data from all the devices on debug mode every time they publish in real time. You can identify your device by the device id. **Note data comes uncalibrated.*
How to retrieve other kit's data?
Current API allows you full access to all the Smart Citizen Platform. Please, ask in the forum or contact support@smartcitizen.me for any questions regarding the API.
How to store data in your own database?
Kit's request
The Smart Smart Citizen Kit is publishing by default the data as a PUT Http request, the sensor data is encoded as JSON.
Here you can see how a kit's request will look like (Note the request is not standard as it do not contains a payload):
PUT /add HTTP/1.1
Host: data.smartcitizen.me
User-Agent: SmartCitizen
X-SmartCitizenMacADDR: 00:00:00:00:00:00
X-SmartCitizenVersion: 1.1-0.8.5-A
X-SmartCitizenData: [{"temp":"29090.6", "hum":"6815.74", "light":"30000", "bat":"786", "panel":"0", "co":"112500", "no2":"200000", "noise":"2", "nets":"10", "timestamp":"2013-10-28 1:34:26"}]
Here you have a kit's request as a Curl for test purposes:
$ curl -X PUT -H 'Host: data.smartcitizen.me' -H 'User-Agent: SmartCitizen' -H 'X-SmartCitizenMacADDR: 00:00:00:00:00:00' -H 'X-SmartCitizenVersion: 1.1-0.8.5-A' -H 'X-SmartCitizenData: [{"temp":"29090.6", "hum":"6815.74", "light":"30000", "bat":"786", "panel":"0", "co":"112500", "no2":"200000", "noise":"2", "nets":"10", "timestamp":"2013-10-28 1:34:26"}]' data.smartcitizen.me/add
Data processing
Values are send without the proper scaling and some sensors as temperature, humidity and noise are sent in raw and then calibrated in our platform. This are the conversion required for SCK 1.1 and above.
| Key | Sensor | Units | Conversion formula | Conversion Method |
|---|---|---|---|---|
| temp | Temperature | ºC | T = -53 + 175.72 / 65536.0 * Traw | SCKSensorData::tempConversion($rawTemp) |
| hum | Humidity | %Rel | H = 7 + 125.0 / 65536.0 * Hraw | SCKSensorData::humConversion($rawHum) |
| light | Light | Lux | L = Lraw / 10 | SCKSensorData::lightConversion($rawLight) |
| noise | Noise | dB | Apply the conversion table from mV to dB: CSV | SCKSensorData::noiseConversion($rawNoise) |
| co | CO | kOhm | CO = COraw / 10000 | SCKSensorData::coConversion($rawCO) |
| no2 | NO2 | kOhm | NO2 = NO2raw / 10000 | SCKSensorData::no2Conversion($rawNO2) |
| bat | Battery | % | B = Braw / 10 | SCKSensorData::batConversion($rawBat) |
| panel | Panel | mV | P = Praw / 10000 | SCKSensorData::panelConversion($rawPanel) |
| nets | Nets | Wi-Fi Networks | Not required | Not required |
| timestamp | Timestamp | YYYY-MM-DD hhss |
Not required | Not required |
You can use the SCKSensorData php class to re-scale and calibrate the received data. Check it on github.
Here is an example how to use it to receive a request, converted and store it in a CSV file:
<?php
    include('../sck_sensor_data.php');

    $headers = getallheaders();

    $data = $headers['X-SmartCitizenData'];

    $datapoints = json_decode($data, true);

    foreach ($datapoints as $datapoint) {
    $datapoint = SCKSensorData::SCK11Convert($datapoint);
        $csv .= implode(', ', $datapoint);
    }

    $csv .= PHP_EOL;

    file_put_contents('./data.csv', $csv, FILE_APPEND);
?>
You can find the complete example here.
Each sensor is implemented as a separate function and some general methods are available for simplifying the work. Here is an example:
<?php

    /**
     * noiseCalibration
     *
     * Noise calibration for SCK1.1 sound sensor. Converts mV in to dBs.
     * Based on a linear regression from a lookup table (db.json)
     * obtained after real measurements from our test facility.
     *
     *
     * @param float $rawSound
     * @return float noise as sound pressure in dB
     *
     */

    public function noiseCalibration($rawSound)
    {
        $dbTable = json_decode(file_get_contents("db.json"), true);
        return round(self::tableCalibration($dbTable, $rawSound), 2);
    }
?>
How to proceed
Here are the different paths you can take in order to built your own backend:
-
Create a fork of the the Smart Smart Citizen Kit firmware in order to send the data as your custom backend expect it.
-
Create your own custom backend. We can share all the different modules of our backend in order for you to receive data as on the curl example above, calibrate it and store it. Contact us at support@smartcitizen.me.
-
Keep using our backend but request our API developer.smartcitizen.me and then fill database choosen with it.
How to install the drivers on Windows?
In Windows you will need to install the Arduino Drivers if you haven't done it before.
Windows 8, 7, Vista, and XP
- Go to the Arduino download page and download the latest version of the Arduino software for Windows.
- When the download is finished, un-zip it and open up the Arduino folder to confirm that yes, there are indeed some files and sub-folders inside. The file structure is important so don’t be moving any files around unless you really know what you’re doing.
- Power up your Smart Smart Citizen Kit by connecting it to your computer with a USB cable. You should see the green LED near the on/off switch light up.
- If you’re running Windows 8, you’ll need to disable driver signing, so go see the Windows 8 section. If you’re running Windows 7, Vista, or XP, you’ll need to install some drivers, so head to the Windows 7, Vista, and XP section down below.
Windows 8
Windows 8 comes with a nice little security ‘feature’ that ‘protects’ you from unsigned driver installation. The Smart Smart Citizen Kit driver is not signed so you’ll have to tell Windows to disable driver signing. This issue has been addressed in newer releases of the Arduino IDE, but if you run into issues, you can try this fix first.
For a nice, step-by-step tutorial with pictures click here, otherwise the steps are outlined below.
To temporarily disable driver signing:
- From the Metro Start Screen, open Settings (move your mouse to the bottom-right-corner of the screen and wait for the pop-out bar to appear, then click the Gear icon)
- Click ‘More PC Settings’
- Click ‘General’
- Scroll down, and click ‘Restart now’ under ‘Advanced startup’.
- Wait a bit.
- Click ‘Troubleshoot’.
- Click ‘Advanced Options’
- Click ‘Windows Startup Settings’
- Click Restart.
- When your computer restarts, select ‘Disable driver signature enforcement‘ from the list.
To permanently disable driver signing (recommended, but has some minor security implications):
- Go to the metro start screen
- Type in “cmd”
- Right click “Command Prompt” and select “Run as Administrator” from the buttons on the bottom of your screen
- Type/paste in the following commands: bcdedit -set loadoptions DISABLE_INTEGRITY_CHECKS bcdedit -set TESTSIGNING ON
- Reboot!
Windows 7, Vista, and XP
Installing the Drivers for the Arduino Uno (from Arduino.cc)
- Plug in your board and wait for Windows to begin it’s driver installation process
- After a few moments, the process will fail, despite its best efforts
- Click on the Start Menu, and open up the Control Panel
- While in the Control Panel, navigate to System and Security. Next, click on System
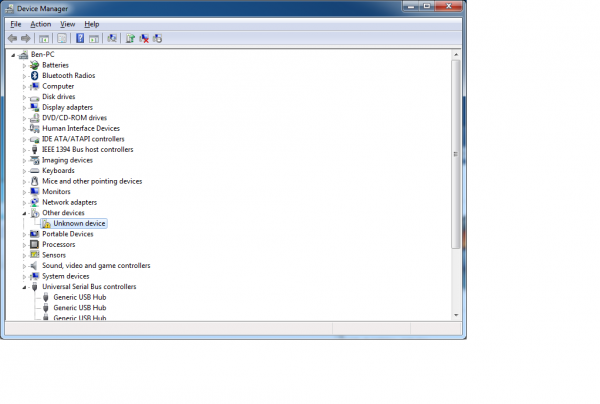
- Once the System window is up, open the Device Manager
- Look under Ports (COM & LPT). You should see an open port named “Arduino UNO (COMxx)”. If there is no COM & LPT section, look under ‘Other Devices’ for ‘Unknown Device’
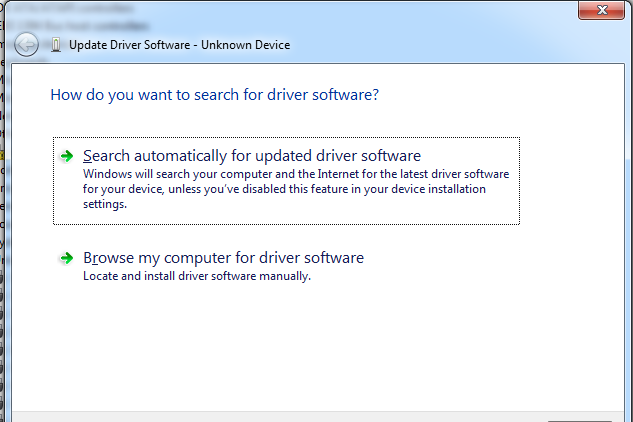
- Right click on the “Arduino UNO (COMxx)” or “Unknown Device” port and choose the “Update Driver Software” option
- Next, choose the “Browse my computer for Driver software” option
- Finally, navigate to and select the Uno’s driver file, named “ArduinoUNO.inf”, located in the “Drivers” folder of the Arduino Software download (not the “FTDI USB Drivers” sub-directory). If you cannot see the .inf file, it is probably just hidden. You can select the ‘drivers’ folder with the ‘search sub-folders’ option selected instead.
- Windows will finish up the driver installation from there
This documentation is proudly based on Sparkfun Arduino on Windows tutorial - CC BY-NC-SA 3.0.
Which LiPo batteries to use?
The battery that we are providing is 3.7v and 2000mAh
Which solar panels to use?
The solar panel it should fulfill the specification of a voltage bigger than 8v and less than 15v, 12v is the recommended voltage, and a minimum of 500mA.
How I can extend the Wi-Fi range?
Is your SCK quite far away from Wi-Fi access point? You can use an external antenna with your SCK.
The Wi-Fi modules has a U.FL antenna connector. We recommend you to use a U.FL to RP-SMA adaptor in order to use standard Wi-Fi antennas. You then will need to enable the External Antenna on the Wi-Fi setup process by selecting External Antenna.
What is the spec (battery type) for the button-cell for the RTC?
The RTC battery is a CR1220
Why is 50dB the microphone lowest value?
Because the actual sensor is limited by the curve bounding from 50dB to 103dB
Browsers compatibility
The SmartCitizen platform is built using the latest Web technologies (such as HTML5, SVG and CSS3). These languages serve as a foundation for today’s websites and web applications.
To enjoy Smart Citizen, we recommend you to use:
Google Chrome 25+ Firefox Mozilla 20+
For the kit setup process only Google Chrome is supported.
What are the LEDs for, and what does the LED blinking mean?
There are 5 LEDs, they are all on the base half of the SCK. They can be understood in three groups:
-
LED2 and LED1 - These are the two yellow (or orange) LEDs in the lower center-left of the board. You will only see these lit when your USB cable is connected to the SCK and you are configuring or otherwise interacting with the SCK. LED2 is the "RX USB" and will be lit when the SCK is receiving information via the USB connection. LED1 is the "TX USB" and will be lit when the SCK is sending information via the USB connection.
-
LED4 and LED3 - These are the two blue LEDs in the lower center of the board. You will see these blink often. LED3 is the "WiFi Association" and LED4 is the "WiFi Connection." The blue LEDs will blink each time the SCK posts new data wirelessly. This is normal behavior and is expected, but it only happens in bursts (then there will be no blue LED lit for about 30-40 seconds). If your blue LEDs are blinking back and forth non-stop, this means your SCK has lost its WiFi connection. Check to make sure your router is still on, and that you're still in range of it.
-
LED5 - This is the green LED in the upper left corner. It will be lit when the SCK is turned on and has power.