Handling calibration data
This guide will help you manage the calibration data for your units. Some sensors perform the data processing on the sensor itself, but other sensor types need more advanced computation that cannot be done in the Smart Citizen Data Board. The table below summarises when you will need to store this calibration data on our platform for it to be processed automatically:
| Sensor type | Processing data | Calibration data |
|---|---|---|
| Basic environmental metrics (T, H, P, Light) | On the sensor | None |
| Noise | On the sensor | None |
| tVOC, eCO2 | On the sensor | None |
| Particulate Matter | On the sensor | None |
| CO2 | On the sensor | None |
| Air Quality electrochemical sensors | On the platform | Based on the hardware ID (see below) |
| Water Quality sensors | On the sensor | None |
How to store calibration data
Warning
Only do this once you have finished setting up your kit. Remember that this process is only needed in case your sensors require calibration (air quality sensors such as CO, NOx, SO2, H2S, OX, and sometimes CO2). This is not necessary for water sensors. If you are using water sensors, follow this guide.
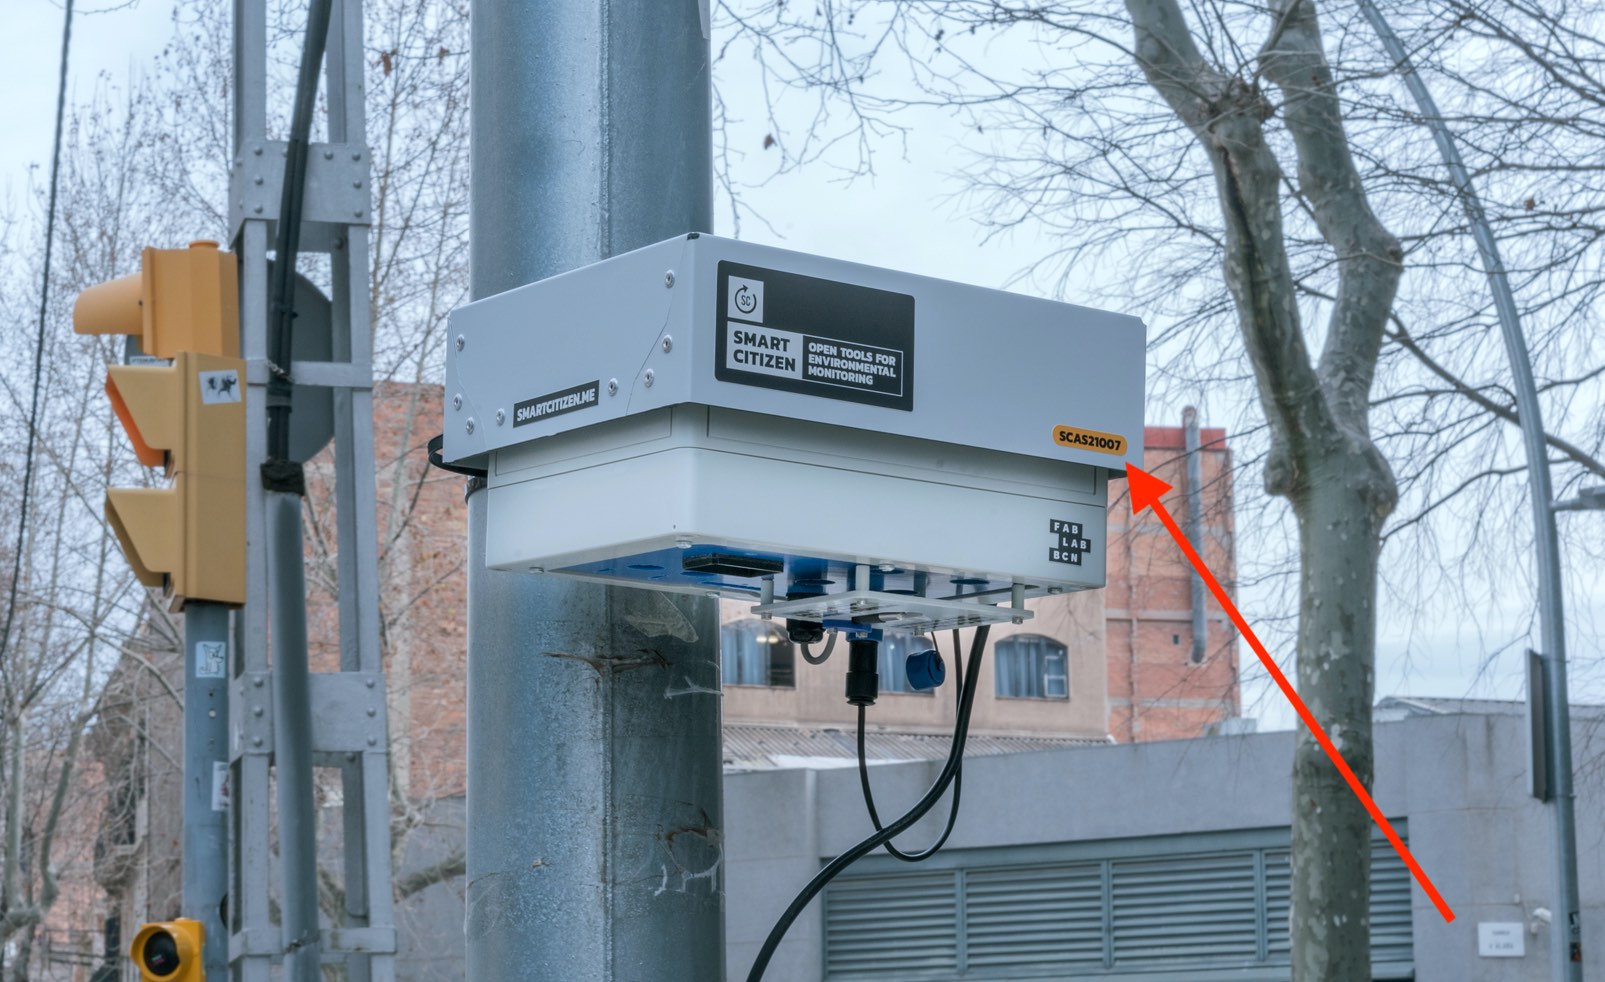
The calibration data for is managed by a unique hardware ID, and should be visible on the device itself (on a yellow sticker, normally on the form of SCAS21000X) as seen below:
Danger
This hardware ID is not the same as the kit ID. The kit ID is the number you have after the smartcitizen.me/kits/ url where you see the data of your kit. The hardware ID is the one in the sticker. The hardware ID is meant to never change, while the kit ID can change as you can register your kit many times!
The easiest way to store this ID is to visit your kit and click on the EDIT button:
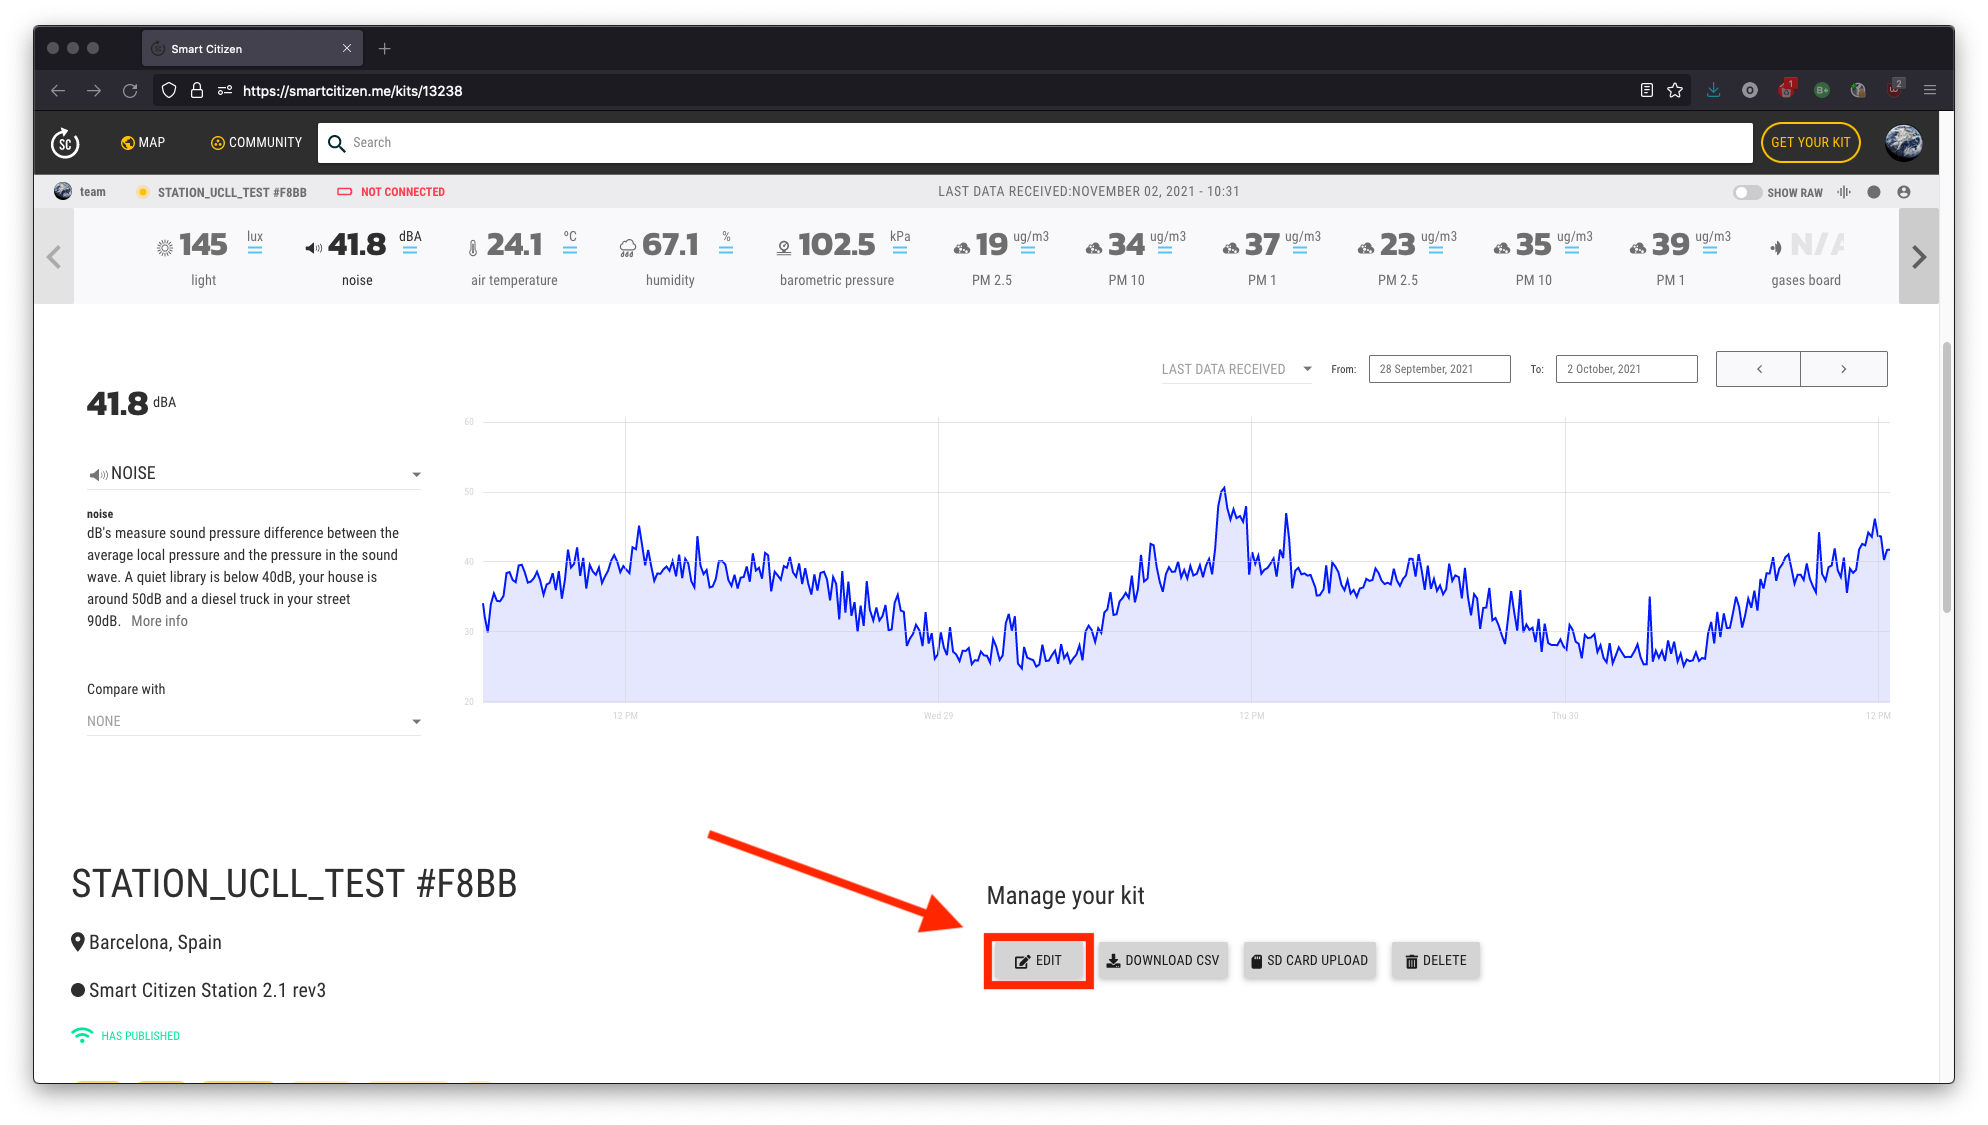
Then, in hardware URL field, introduce the number in the yellow sticker. Save your work and you are done!

Advanced setup
Warning
Only follow these steps if you are working on the data post-processing of the sensors, or you know what all this means!
The above mentioned hardware ID serves to identify the hardware calibration data, alongside with the processing description we want for that device. All this information can be saved in the platform's device using the postprocessing field of the device.
The hardware url field in the kit edit page can contain a simple id as shown above or an URL pointing to a valid json:

This url should point to a valid json, and as long as it follows the instructions defined below (here you can find some examples), it will be picked up for data postprocessing. A simpler way, is that it can simply be one of the HARDWARE-ID from the list of jsons available in https://raw.githubusercontent.com/fablabbcn/smartcitizen-data/master/hardware/<HARDWARE-ID>.json. The default hardware definitions are in the scdata github repository and can be found per ID.json. You can just take the corresponding ID and click in the raw button to get the url needed. If you are using this method, and an url from github, this field should look something like: https://raw.githubusercontent.com/fablabbcn/smartcitizen-data/master/hardware/SCAS21001.json.
With either method, url or HARDWARE-ID, the json file needs to follow the instructions below to successfully be a valid postprocessing:
{
  "blueprint_url": "https://raw.githubusercontent.com/fablabbcn/smartcitizen-data/master/blueprints/sck_21.json",
  "description": "Smart Citizen Kit 2.1 With PMS5003",
  "versions": [],
  "forwarding": "nilu"
}
blueprint_url: this field defines the post-processing to be done in the form of adevice-blueprint. It virtually can load a valid json from any url, as long as it follows the instructions defined here and here. If you want to use the base processing select it from the blueprints folder, only selecting therawjson as mentioned above. If you have doubts, please, contact us to make sure everything will run smoothly. Finally, other blueprints can be added as defined in this guidedescription: brief description of the hardware-
versions: list containing hardware versions (in case sensors where replaced, but kept in the same physical unit)."versions": [ { "ids": { "AS_48_01": "162581715", "AS_48_23": "202365014", "AS_4A_01": "164200218", "AS_4A_23": "204440527" }, "from": "2020-11-30", "to": null } ]In the versions information, data is stored based on the IDs of the sensors and a naming convention to understand were they are connected to or what they are. It is easier to understand the naming convention with an example:
AS_48_01: Alphasense Electrochemical sensor, connected to the ADC with address48, with the Working Electrode connected to the channel 0 of the ADC, and the Auxiliary Electrode connected to the channel 1 of the ADC. The logic is explained below:ASrefers to Alphasense. This implies that the rest of the name is going to be on the formatX_YZ48refers to the ADC (analog to digital converter) I2C address. Since we only store the raw data values from the ADC, we use the ADC I2C address to refer to the needed channels01are the two channels from the ADC in question that are used for measuring the WE and AE from the Alphasense sensor
-
forwarding: if this device needs to be forwarded to another data platform. Current supported platforms are specified in the connectors folder
Alternative method
Alternatively, in order to post this data, you can follow to other methods:
- either send us the kit ID and it's corresponding hardware ID, and we will do this for you
- or, if you are familiar with
http requestsyou canpostthis data as such:
curl 'https://api.smartcitizen.me/v0/devices/<DEVICE-ID>' -X PATCH -H 'Authorization: Bearer <BEARER-FROM-YOUR-USER-PROFILE>' -H 'Content-Type: application/json;charset=UTF-8' --data-binary '{"postprocessing_attributes": {"blueprint_url": "https://raw.githubusercontent.com/fablabbcn/smartcitizen-data/master/blueprints/<BLUEPRINT_ID>.json", "hardware_url": "https://raw.githubusercontent.com/fablabbcn/smartcitizen-data/master/hardware/<HARDWARE_ID>.json"}}' --compressed
You can get your authorization token on your user profile page in the OAuth section. Make sure to change the following fields in the command above:
<DEVICE-ID><BEARER-FROM-YOUR-USER-PROFILE><HARDWARE_ID>, for instanceSCAS210002<BLUEPRINT_ID>, for instancesc_21_station_modulefor Smart Citizen Stations
Check it out
Once this process is done, you should be able to check that the postprocessing is safely stored in the Platform by visiting: https://api.smartcitizen.me/v0/devices/<DEVICE-ID>/. After this, we will take care of processing the data in a periodic way.