Water Sensors Calibration

The Smart Citizen firmware has built-in support for the calibration of the Atlas Scientific sensors. In order to calibrate the sensors you will need to use the SCK Shell.
To enable the sensors you just need to turn your Kit off, plug the carrier boards (tentacle T3 or individual EZO carriers) to the Auxiliary Port and turn it back on. The sensors will be automatically detected by the Data Board.
Warning
When calibrating don't use the normal read sensor command, this command applies temperature/salinity compensation and will ruin your calibration. Calibration should be done without any compensation. Instead you should use control sensorName com r and that will return the raw metrics that sensor can provide. On the documentation of each sensor calibration procedure we describe the format of this metrics.
Before we start
Two important notes:
- A lot of the materials from this guide are taken from Atlas Scientific datasheets. All credit to the well-designed images is theirs. We have integrated these probes in the Smart Citizen Kit because of their quality and good documentation. This page is not meant to be a replacement for Atlas Scientific documents and we do not have any affiliation to Atlas Scientific.
- There is also additional webinars that can support this page in more detail. Here you can find the presentation and the link to the videos below:
Atlas PH
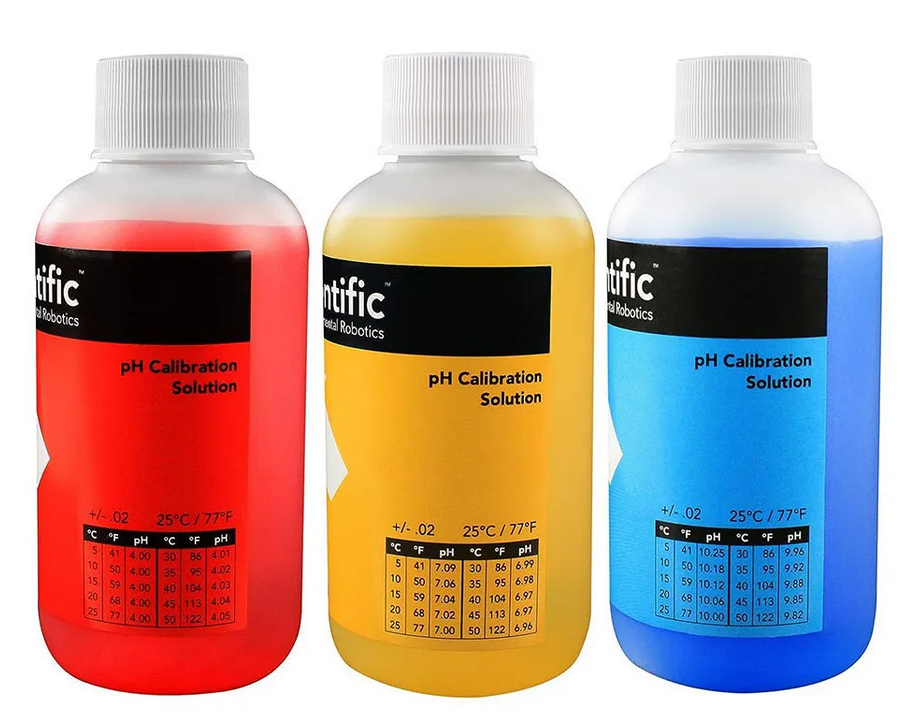
You need to perform a 3-point calibration with the calibration solutions. The solutions vary their pH with temperature, so make sure to check the temperature prior. The pH value at current temperature can be found on the reference table on the calibration solution bottle - you can find it here.
Datasheet
Here you can find:
- The consumer grade pH probe datasheet
- The lab grade pH probe datasheet
- The pH driver datasheet:
- Calibration theory on page 11
- Commands on page 52
Example commands
control ph com r
control ph com cal,[mid,low,high],value
control ph com cal,clear
control ph com cal,?
3-point calibration
This is the order of the calibration:
- Mid point (7.00)
- Low point (4.00)
- High point (10.00)
Warning
Always calibrate the mid point first because it will erase all the previous calibrations you may have done.
Danger
Always clean the probe with distilled water between each calibration.
Mid point calibration
-
Put the sensor in the pH 7.00 calibration solution (mid point, the yellow one). The probe needs to be in the calibration solution until you issue the calibration command.
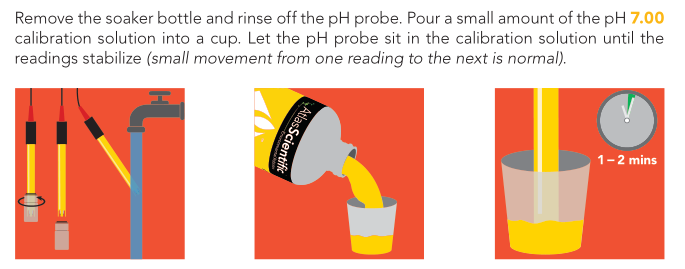
-
Read the sensor multiple times until the reading is stable:
SCK > control ph com r 6.48 SCK > control ph com r 6.45 ... -
Issue the mid point calibration command. Remember to input the pH value of the calibration solution at the current temperature
SCK > control atlas ph com cal,mid,[value of pH calibration solution at current temperature]Example at 30°C
SCK > control atlas ph com cal,mid,6.99 -
After this command, if you take a pH reading, the result should be 7.00 (or very close to it). You can now remove the probe from the calibration solution and clean it.
Low Point Calibration
-
Put the sensor in the pH 4.00 calibration solution (low point, the red one). The probe needs to be in the calibration solution until you issue the calibration command.
-
Read the sensor multiple times until the reading is stable:
SCK > control ph com r 3.98 SCK > control ph com r 3.98 ... -
Issue the low point calibration command. Remember to input the pH value of the calibration solution at the current temperature
SCK > control atlas ph com cal,low,[value of pH calibration solution at current temperature]Example at 30°C
SCK > control atlas ph com cal,low,4.01 -
After this command, if you take a pH reading, the result should be 4.00 (or very close to it). You can now remove the probe from the calibration solution and clean it.
High Point Calibration
-
Put the sensor in the pH 10.00 calibration solution (high point, the blue one). The probe needs to be in the calibration solution until you issue the calibration command.
-
Read the sensor multiple times until the reading is stable:
SCK > control ph com r 9.84 SCK > control ph com r 9.84 ... -
Issue the high point calibration command. Remember to input the pH value of the calibration solution at the current temperature
SCK > control atlas ph com cal,high,[value of pH calibration solution at current temperature]Example at 30°C
SCK > control atlas ph com cal,high,9.96 -
After this command, if you take a pH reading, the result should be 10.00 (or very close to it). You can now remove the probe from the calibration solution and clean it. Calibration process is done.
Extra notes
The command control com cal,? can be used to check the calibration status as explained on datasheet page.
The answers can be:
?CAL,0→ No calibration done?CAL,1→ One point calibration done?CAL,2→ Two point calibration done?CAL,3→ Three point calibration done
(not tested) If your calibration solutions are not 4, 7 and 10, you can still use them and replace [value of pH at current temperature] by your values.
Calibration solutions temperature
The pH value of the calibration solutions is affected by temperature. Make sure you compensate according to the table below when you input the calibration value:
Atlas Conductivity
You need to perform a 3 step calibration process with a dry point (in air), followed by a 2-point calibration (with the calibration solutions).
Datasheet
Here you can find:
- The K0.1 conductivity probe datasheet
- The K1 conductivity probe datasheet
- The K10 conductivity probe datasheet
-
The driver datasheet:
- Calibration info on page 12
- Calibration commands on page 55
Example commands
control conductivity com r
control conductivity com K,[probeType]
control conductivity com K,?
control conductivity com cal,[dry,clear,84]
control conductivity com cal,low,1413
control conductivity com cal,high,12,880
control conductivity com cal,?
2-point calibration
This is the order of the calibration:
- Set probe type.
- Dry point calibration (independent of the probe type).
- Low point calibration (calibration solution to use dependent on the probe type).
- High point calibration (calibration solution to use dependent on the probe type).
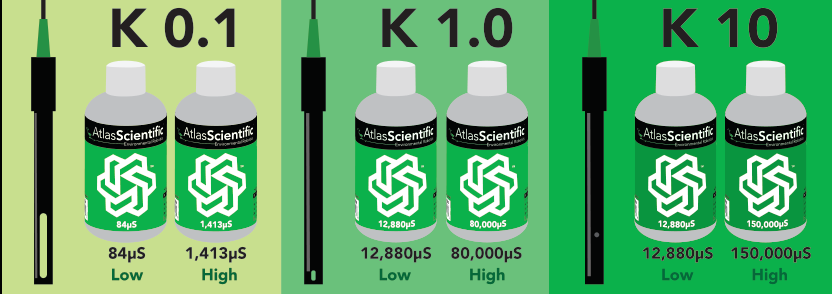
Set probe type
Depending on which probe you have (check drawing for reference) you should set the probe type to K 0.1, 1.0 or 10 (new drivers have K1.0 as default):
To set the correct probe type:
SCK > control conductivity com K,1.0
To double-check which type is set:
SCK > control conductivity com K,?
?K,1.0
About the sensor
The Electrical Conductivity sensor provides four different metrics:
- Electrical Conductivity → EC
- Total Dissolved Solids → TDS
- Salinity → S
- Specific Gravity → SG
The data is presented in order and comma separated EC,TDS,S,SG, for instance 0.00,0,0.00,1.000
Readings are 0?
It is normal that if the probe type has changed (for instance, if you are using a K10 probe), that the readings are 0 after setting the probe type.
Dry calibration
Follow the steps below with a dry sensor before introducing it to the calibration solutions. You need to do this step even if the readings in are 0.
-
Read the sensor multiple times until the reading is stable:
SCK > control conductivity com r 0.00,0,0.00,1.000 SCK > control conductivity com r 0.00,0,0.00,1.000 ... -
Issue the dry calibration command:
SCK > control conductivity com cal,dry
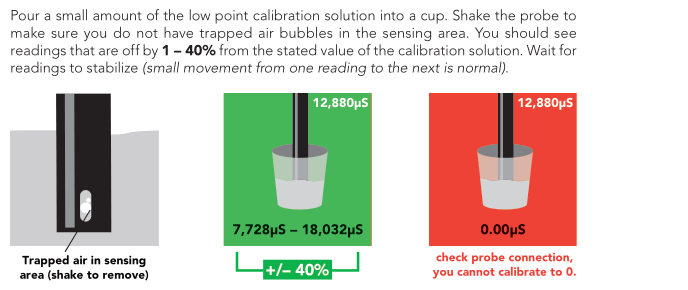
Low point calibration
You can check the recommended calibration solutions for each probe on the Probetypes drawing (for instance, for the K1.0 probe, the 12,880uS and 80,000uS solutions are recomended)
-
Put the probe in the low point calibration solution. Make sure there are no bubbles. The probe needs to be in the calibration solution until you issue the calibration command.
-
Read the sensor multiple times until the reading is stable:
SCK > control conductivity com r 13470,7278,7.76,1.0 SCK > control conductivity com r 13230,7144,7.61,1.0 ... -
Issue the low point calibration command. The value to input is the one of the calibration solution, for example 12880:
SCK > control conductivity com cal,low,12880
After this command readings will not change. You can remove the probe from the calibration solution and rinse it now. Calibration solution can be reused.
High point calibration
Repeat the steps above with high point calibration solution.
-
Put the probe in the low point calibration solution. Make sure there are no bubbles. The probe needs to be in the calibration solution until you issue the calibration command.
-
Read the sensor multiple times until the reading is stable:
SCK > control conductivity com r 79520,...,... SCK > control conductivity com r 79530,...,... ... -
Again, remember that the value to input here is the one from the calibration solution, for instance 80000:
SCK > control conductivity com cal,high,80000
After this steps the two point calibration is complete and the readings will change.
Values always at 0 for EC?
If you see 0 values, no matter what you do with the probe, it might be that you need to follow the factory reset procedure
SCK > control conductivity com r
0,0,0.00,1.000
SCK > control conductivity com r
0,0,0.00,1.000
...
Atlas DO
You have two options for this calibration:
- Single point calibration (dry point)
- 2-point calibration (dry point and 0 mg/l point) - only if you need accurate readings below 1mg/l
Make sure you have followed the probe reconditioning before proceeding with this calibration.
Datasheets
Here you can find:
- The datasheet of the lab grade probe
- The datasheet of the mini lab grade probe
- The datasheet of the driver:
- Calibration info on page 9
- Calibration commands on page 52
Example commands (you can put control ox, control oxygen or control dissolved oxygen - however! do not put control dissolved as it will use TDS)
control dissolved oxygen com r
control dissolved oxygen com cal
control dissolved oxygen com cal,0
control dissolved oxygen com cal,clear
control dissolved oxygen com cal,?
Pressure compensation
If the sensor is going to be used more than 10 meters deep into the water Pressure compensation should be set with:
SCK > control dissolved oxygen com P,kPaValue
More information on datasheet, page 57
Single point calibration
First calibrate, compensate later
Temperature, salinity and pressure compensation values have no effect on calibration.
-
Read the sensor multiple times until the reading is stable.
SCK > control dissolved oxygen com r 13.95,50% SCK > control dissolved oxygen com r 13.76,49% ... -
Issue the calibration command, after this the readings will change. In this case, there is no need to add any value after
cal. The sensor will take the current reading as the dry point.SCK > control dissolved oxygen com cal
Be careful
If at any point of the calibration process you see akward readings (for instance, that using a 0mg/l solution for dissolved oxygen you see weirdly high values), it is better to start over. For this, proceed with:
SCK > control dissolved oxygen com cal,clear
And start from the beginning.
2-point calibration
Two point calibration is recommended if you require accurate readings below 1.0 mg/l. After completing the single point calibration procedure put the probe in the calibration solution.
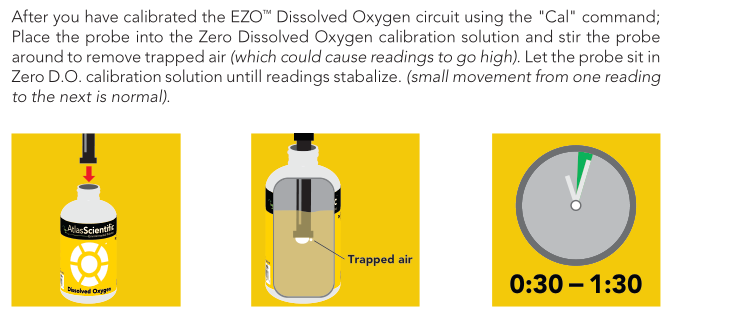
-
Put the probe in the 0mg/l point calibration solution. Make sure there are no bubbles. The probe needs to be in the calibration solution until you issue the calibration command.
Be careful
As you are calibrating the probe, oxygen is going into the solution. This calibration solution can't be reused if left open for long periods of time. Make sure you check the driver datasheet (page 6 and 7) for more info.
-
Read the sensor multiple times until the reading is stable:
SCK > control dissolved oxygen com r 13.95,50% SCK > control dissolved oxygen com r 13.76,49% ... -
Issue the calibration command. In this case, you have to input the value of the calibration solution too, for example 0:
SCK > control dissolved oxygen com cal,0
Check the common pitfalls
Atlas has some interesting videos about this probe common issues:
[Dissolved Oxygen | Common Mistakes | Air Bubble](https://youtu.be/1I1Sk9pt47c)
[Dissolved Oxygen | Common Mistakes | Stagnant vs Moving Water](https://youtu.be/d9zkxkv55SE)
[Dissolved Oxygen | Common Mistakes | Damaged Membrane](https://youtu.be/PiXnvrTnVjs)
Atlas ORP
You only need to perform a single point calibration. You can use any calibrated solution, as long as it's within your sensor range. Atlas Scientific uses a 225mV calibration solution.
Datasheet
Here you can find: - The consumer grade ORP probe datasheet - The lab grade ORP probe datasheet - The driver datasheet: - Calibration info on page 12 - Calibration commands on page 49
Example commands
control redox com r
control redox com cal
control redox com cal,[value]
control redox com cal,clear
control redox com cal,?
Single point calibration

-
Read the sensor multiple times until the reading is stable. Make sure there are no bubbles. The probe needs to be in the calibration solution until you issue the calibration command.
SCK > control redox com r 225 SCK > control redox com r 224 ... -
Issue calibration command:
SCK > control redox com cal,[value of calibration solution redox in mV]
Example at 25°C
SCK > control redox com cal,225
Atlas PT100/1000 Temperature
You only need to perform a single point calibration. This process is only necessary if you change the probe cable or the first time you use the sensor.
Datasheet
Here you can find: - The PT-1000 probe datasheet - The driver datasheet: - Calibration info on page 12 - Calibration commands on page 53
Example commands
control atlas temp com r
control atlas temp com cal
control atlas temp com cal,[value]
control atlas temp com cal,clear
control atlas temp com cal,?
Warning
This is needed because the temperature probe is a resistive sensor – more cable → more resistance!
Reference
You will need another temperature probe or something of known temperature (like boiling water) that is already calibrated for this. Make sure both are stable before issuing calibration commands!
Single point calibration
-
Read the reference probe multiple times until the reading is stable. Write down the value:
SCK > control atlas temp com r 22.5 SCK > control atlas temp com r 22.4 ... -
Read the target probe multiple times until the reading is stable:
SCK > control atlas temp com r 29.5 SCK > control atlas temp com r 29.4 ... -
Issue calibration command:
control atlas temp com cal,[value of temperature from reference probe or temperature]
Factory reset procedure
Why is this needed?
You may need to do a factory reset for water sensors for different reasons. However, the most common case is a wrong calibration process and it's very much related to a wrongful automatic temperature compensation of the sensor while calibrating the sensor.
To explain further: EC, DO and pH sensor readings are automatically compensated by temperature readings. If there is an existing temperature correction in the EZO driver, or there is a correction in the middle of the calibration process, the data available for the calibration process will be invalid. Follow the steps below to be make sure there is no correction while you calibrate the probes.
Each EZO driver has it's independent calibration and status. This process needs to be done per driver (i.e. per EZO metric). To make a factory reset procedure for the EZO drivers follow the steps below:
-
Make sure that the Smart Citizen Data board will not take any readings while you follow the calibration process. The best option is to reset the configuration to the defaults. Make sure you back-up your information before:
- The config command will output your current configuration. Copy it and keep it safe:
config- Then issue the default configuration:
config -defaults- The LED should be red now (the Data Board is in Setup mode)
-
Issue the factory reset command to the driver in question. For instance, for the conductivity one:
control cond com factory 0 -
Now you can check what the status of the device is:
control cond com cal,? ?CAL,0 -
Reset the kit
-
Follow the calibration process as you would normally would. Remember that for conductivity you may need to re-issue the probe type
-
Reconfigure the kit using the
configcommand, by putting back the information you backed-up before:config -mode ...
Ready to go?
If you want to send the data to the platform, you will need to register the unit using the Advanced Kit Selection. At the moment the closest Kit Blueprint will be #22 BioPV Kit or #31 SCK 2.1 Sea Water in case you are using a SCK2.1 with GPS. You can request in the forum for a custom blueprint with the specific sensors you are using.
Danger
After finishing the calibration process restart your SCK to start from a clean state.