Edit the Firmware
The data board of your Smart Citizen Kit is has two two microcontrollers:
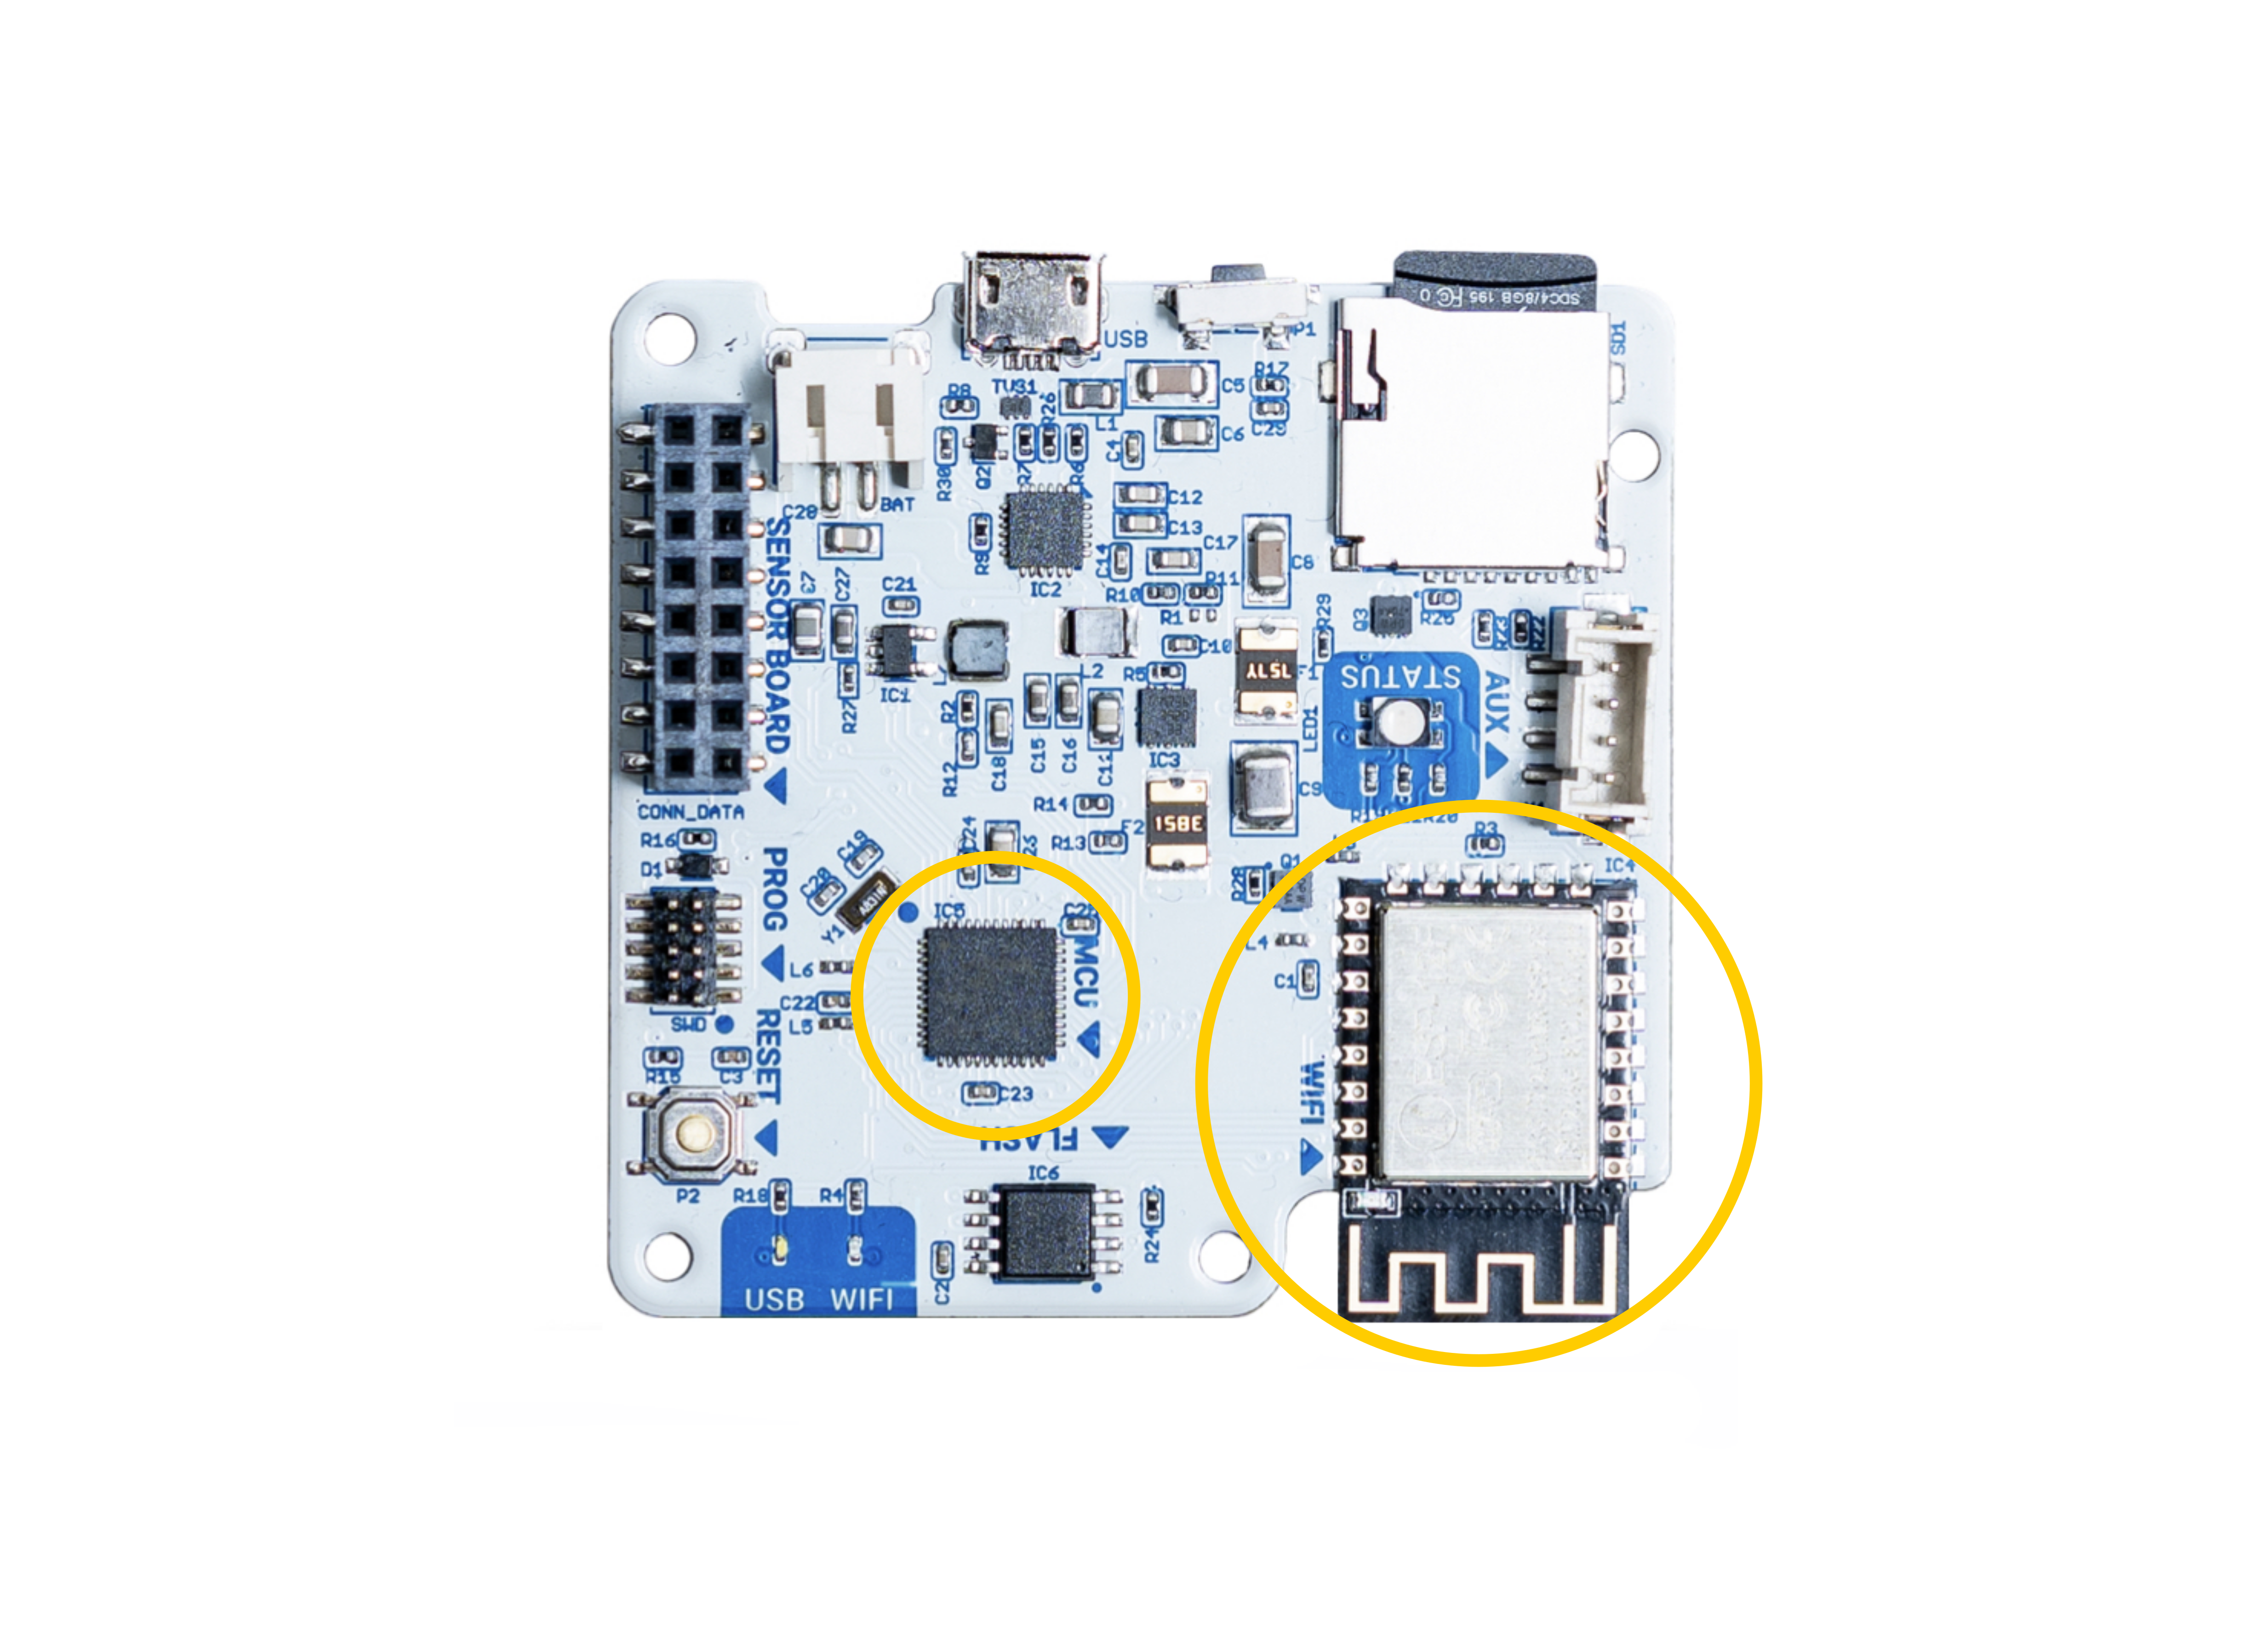
The main one is an Atmel SAMD21, this chip is in charge of all the normal tasks like reading the sensors, saving data, interacting with the user, etc. For this chip we need two software components the bootloader and the main firmware.
For communications the SCK has an ESP8266 microcontroler with Wifi capabilities, this chip receives instructions from the SAMD21 via serial port and takes care of publishing the collected data through the network and takes care of serving the web pages for the setup mode configuration server.
Prerequisites
Getting the firmware
The Smart Citizen Kit Firmware is on our repository on github so you will need git software installed.
Danger
Do not install anything until reading completely this guide. Specially for Windows users, it can be particularly painful and we don't guarantee everything is going to work. Drop us an email at support if you need help.
Building the firmware
To build the SmartCitizen Kit firmware you need a computer with platformio installed. You don't need the full IDE installation (Atom or VSCode). You can follow these instructions to install only the console version. See below if you don't have python yet (or you don't know it's ok).
Advanced
For bootloader upload you also need OpenOCD somewhere in your PATH (more advanced).
Windows users
If you have Windows, the CLI version is available via PowerShell. An environment variable (PATH) needs to be set to give access to pio.exe. It's given in the Platformio instructions.
Installing Python
Platformio is written in python, and this guide makes use of a lot of python scripts. You need to have at least python=3.6installed. If not, follow this guide. This guide will asume you use either python, python3 for running scripts, or pip and pip3 for installing things, we will just detail instructions run by python and packages installed by pip, but you should know what it's installed on your computer.
Windows users
We recommend:
- Using PowerShell (with admin rights). If you don't have it installed you can follow these instructions
- Installing Chocolatey and then proceeding with:
choco install python
Read very carefully the output of the installation.
- You can check if you have python installed:
> which python
/usr/bin/python
Windows
To do this in Windows, you can check the output of python --version
- Install
pipif you don't have it (checkpipbefore):
> curl https://bootstrap.pypa.io/get-pip.py -o get-pip.py
> python get-pip.py
Installing requirements
You can use this requirements file to install everything you need to compile the firmware. Alternatively you can follow the steps below or if you want to control each version:
- Install
pyserial:
> pip install pyserial==3.5
- Install
requests:
> pip install requests==2.26.0
- Install
platformio:
> pip install platformio==5.1.1
Versions
Versions for these packages are tested to work on OSX and Linux. If you can't find the same version for your platform, try to install something similar to the one provided in order to ensure everything works fine
Once this is running, you can do either of the ones below. We will use the generic one throughout the guide:
> cd smartcitizen-kit-21
> python make.py -h
> cd smartcitizen-kit-21
> ./make.py -h
Getting the firmware
To get the firmware just run:
> git clone --recursive https://github.com/fablabbcn/smartcitizen-kit-21
The bootloader and tools repositories are submodules of the main firmware so you must do a --recursive clone to get them.
Info
If you download the code manually (with the clone or download button on github) you will not get the bootloader and tools submodules code. To be able to compile the firmware you need to download the tools submodule and place it in the proper folder.
Getting latest changes
If you want to update firmware, you can do so since the repository is connected with our Github repository via git. You can do so by:
cd smartcitizen-kit-21
git pull
...
cd tools
git pull origin master
...
Or simply:
cd smartcitizen-kit-21
git pull --recurse-submodules
...
SAMD21 bootloader
Make sure you need to do this
This instructions only are needed if your kit doesn't have the bootloader already flashed. If you don't know what you are doing here, skip to the flashing section.
If your kit doesn't have the bootloader already flashed (all the kits that we ship come with it) you will need an ATMEL-ICE programmer. This process can also be done with a Raspberry Pi computer and the proper connector and cables, in this guide you will find information on how to do this.
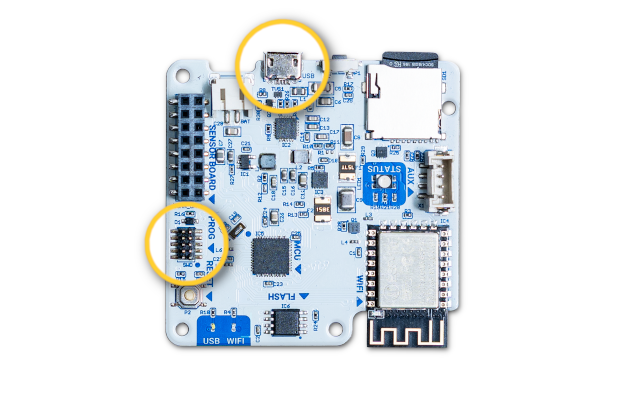
Connect the Atmel-ICE programmer to the 10 pin SWD connector and to your computer. Power the SCK via USB, you can use any USB charger or even your computer.
Open a terminal, go to the folder where you cloned the firmware repository and run:
> cd smartcitizen-kit-21
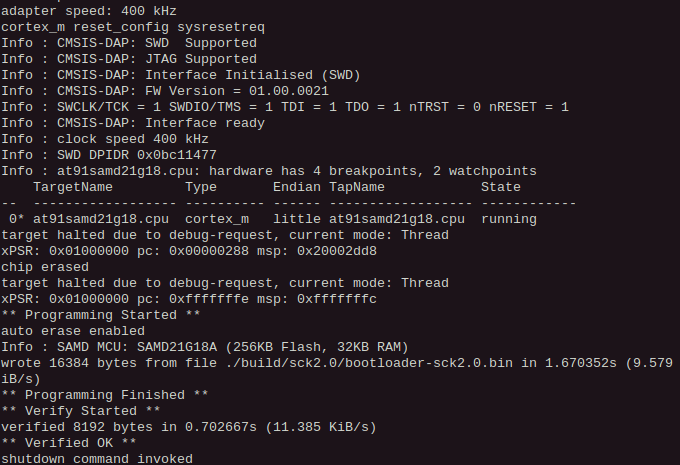
> ./make.py boot
You will see a lot of output when compiling, the led on the SCK should breath in green and you should see an output similar to this:
You are ready for the next step, just remember to disconnect the Atmel-ICE programmer and connect the SCK to your computer with a USB cable.
SAMD21 firmware
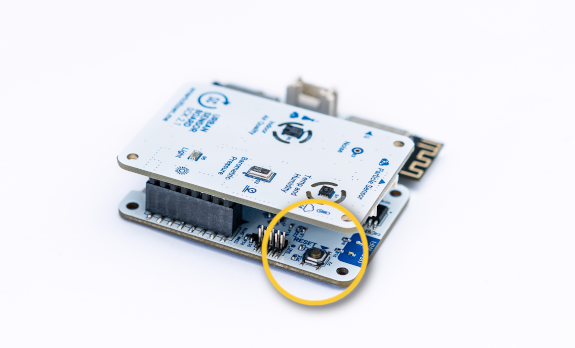
The bootloader we just flashed allows a very simple way of uploading the SCK firmware based on the UF2 format, when you double-click the reset button of your kit it will expose a MSD interface to your computer and a new drive will popup where you can just drag the compiled firmware file (converted to UF2 format).
Build script
> python make.py

You need to specify at least one action!!!

USAGE:

build.py [options] action[s] target[s] -p port -f

options: -v: verbose -k: keep configuration
actions: boot (only for sam), build, flash
targets: sam, esp [-p port [-f]]
-p port [-f]: specify a port instead of scanning
-f: option ignores serial device description (must contain Smartcitizen otherwise)
You can use the same script used to flash the bootloader (make.py) that will do everything for you: compile the firmware, convert the binary to UF2 format and upload it to the kit:
> python make.py build flash sam -v
You can make each action separate:
> python make.py build sam -v
> python make.py flash sam -v
> python make.py build flash sam -v
SCK not found
In some platforms, the SCK doesn't show up as "Smartcitizen" in the USB Device Description. This might make the script to fail and not detect it. This can be bypassed by specifying the port in which the SCK is connected. To find out which port it is, check here. Then, run the command below, where
> python make.py flash sam -p <PORT> -v
If this is your first time building the software, platformio will take a while installing all the needed dependencies, be patient. If there are no errors you should see an output similar to this:
> python make.py build flash sam
[0] Smartcitizen Kit S/N: 6E9FE7335150364852202020FF180E30
Building SAM firmware... OK
Flashing SAM firmware... OK
A copy of the compiled software in UF2 format called SAM_firmware.uf2 will remain in the bin folder. You can use this file to reflash your kit without compiling it again.
Info
If you have any problem you can enable verbose output by calling build.py script with the -v flag. There is a known issue that causes first compilation to fail, if this happens please just try again.
Manual process
If you want to install the firmware manually (or you had some problem with the build script) just follow this steps:
> cd sam
> pio run
After a lot of compilation messages you should see an output similar to this:
Indexing .pio/build/sck2/libFrameworkArduino.a
Linking .pio/build/sck2/firmware.elf
Checking size .pio/build/sck2/firmware.elf
Building .pio/build/sck2/firmware.bin
Advanced Memory Usage is available via "PlatformIO Home > Project Inspect"
RAM:   [=======   ]  73.3% (used 24004 bytes from 32768 bytes)
Flash: [========  ]  80.7% (used 211548 bytes from 262144 bytes)
====================== [SUCCESS] Took 43.41 seconds ======================
then to convert the binary firmware to UF2 format do:
> cd ..
> ./tools/uf2conv.py -o SAM_firmware.uf2 sam/.pio/build/sck2/firmware.bin
And you should see something like this:
Converting to uf2, output size: 423424, start address: 0x2000
Wrote 423424 bytes to SAM_firmware.uf2.
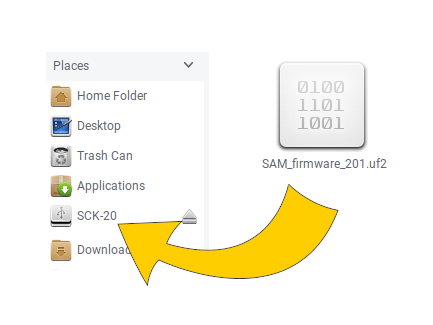
Now double-click the reset button of your kit open your favorite file browser and drag the file you just created to the SCK-2.0 drive. The kit will reset and run the new firmware.
Info
Keep in mind that if your computer is not configured to automount new drives you will need to mount your sck manually (as any other USB drive).
ESP8266 firmware
Just like the other parts of the process this is also covered by our make.py script. So you can just do:
> python make.py build esp -v
> python make.py flash esp -v
> python make.py build flash esp -v
As before, if this is the first time you do it, it will take a while on downloading dependecies and building the firmware.
In this case the upload process is different, since the ESP8266 chip is not connected to the USB interface the data must be uploadded through the SAMD21 chip. Our upload script takes care of searching for a SCK on the USB bus, sending a command to the kit so it put's himself in what we call bridge mode (white led) and uploading the firmware. This is the expected output:
> python make.py build flash esp
[0] Smartcitizen Kit S/N: 6E9FE7335150364852202020FF180E30
Building ESP firmware... OK
Flashing ESP firmware... OK
Warning
Sometimes the ESP8266 and the uploader software don't get synced and the upload fails. Normally if you try again it will work. After first try you don't need to rebuild, you can just do python make.py flash esp.
Manual update
You can perform a manual update if you only want or can have a small pythoninstallation. Another option is possible if you have platformio and you want to use esptool binaries.
Using esptool.py
Preparation
- Get
esptool.py:
> wget https://raw.githubusercontent.com/fablabbcn/smartcitizen-tools/master/esptool.py
- Get the latest firmware from https://github.com/fablabbcn/smartcitizen-kit-21/releases or ask us at support
Flashing
-
Get your usb-port id (check here):
-
Put the SAM in bridge mode (replace
<PORT>with the portname from above).
> echo 'esp -flash 115200' > <PORT>
echo not working?
You can do the same in the Arduino IDE, using the Serial Monitor and writing esp -flash 115200. Remember to close the Serial Monitor window after it.
Now you should see the SCK's LED in WHITE.
- Flash the esp using
esptool.pyfrom before. Make sure theESP_firmware.binis also there (replace<PORT>):
> python esptool.py --port <PORT> --baud 115200 write_flash 0x000000 ESP_firmware.bin
Using esptool binaries
Locate esptool binaries:
> cd smartcitizen-kit-21/sam
> pio run -t envdump | grep PROJECT_PACKAGES_DIR
...
Find PROJECT_PACKAGES_DIR in the output and navigate to (replace <PROJECT_PACKAGES_DIR>):
> cd <PROJECT_PACKAGES_DIR>/tool-esptool
> ls
...
There you should find a binary file for esptool. Now you should be able to run (replace <PROJECT_PACKAGES_DIR> and <PORT>):
> cd smartcitizen-kit-21
> echo 'esp -flash 115200' > <PORT>
> <PROJECT_PACKAGES_DIR>/tool-esptool/esptool -cp <PORT> -cb 115200 -ca 0x000000 -cf bin/ESP_firmware.bin
Remember you can put the SAMD21 in bridge mode (white LED) by using Arduino IDE, sending esp -flash 115200 using the Serial Monitor and then closing the Serial Monitor window.
Finding the port
-
For Windows, open the device manager and find the SCK in
Ports (COM & LPT). Use that port (normallyCOM...). -
For macOS and linux, normally
/dev/*:
> ls /dev/* | grep usb
> ls /dev/* | grep tty